 View on GitHub
Payments SDK for iOS
The Payments SDK is a solution to ease the integration with the Alviere services.
- Features
- Requirements
- Installation
- Usage
- Text and Localization
Features
- Payment Methods Management
- Account Wallet
- Check Deposit
Requirements
- iOS 13.0+
- Xcode 15+
- Swift 5.5+
Installation
Swift Package Manager
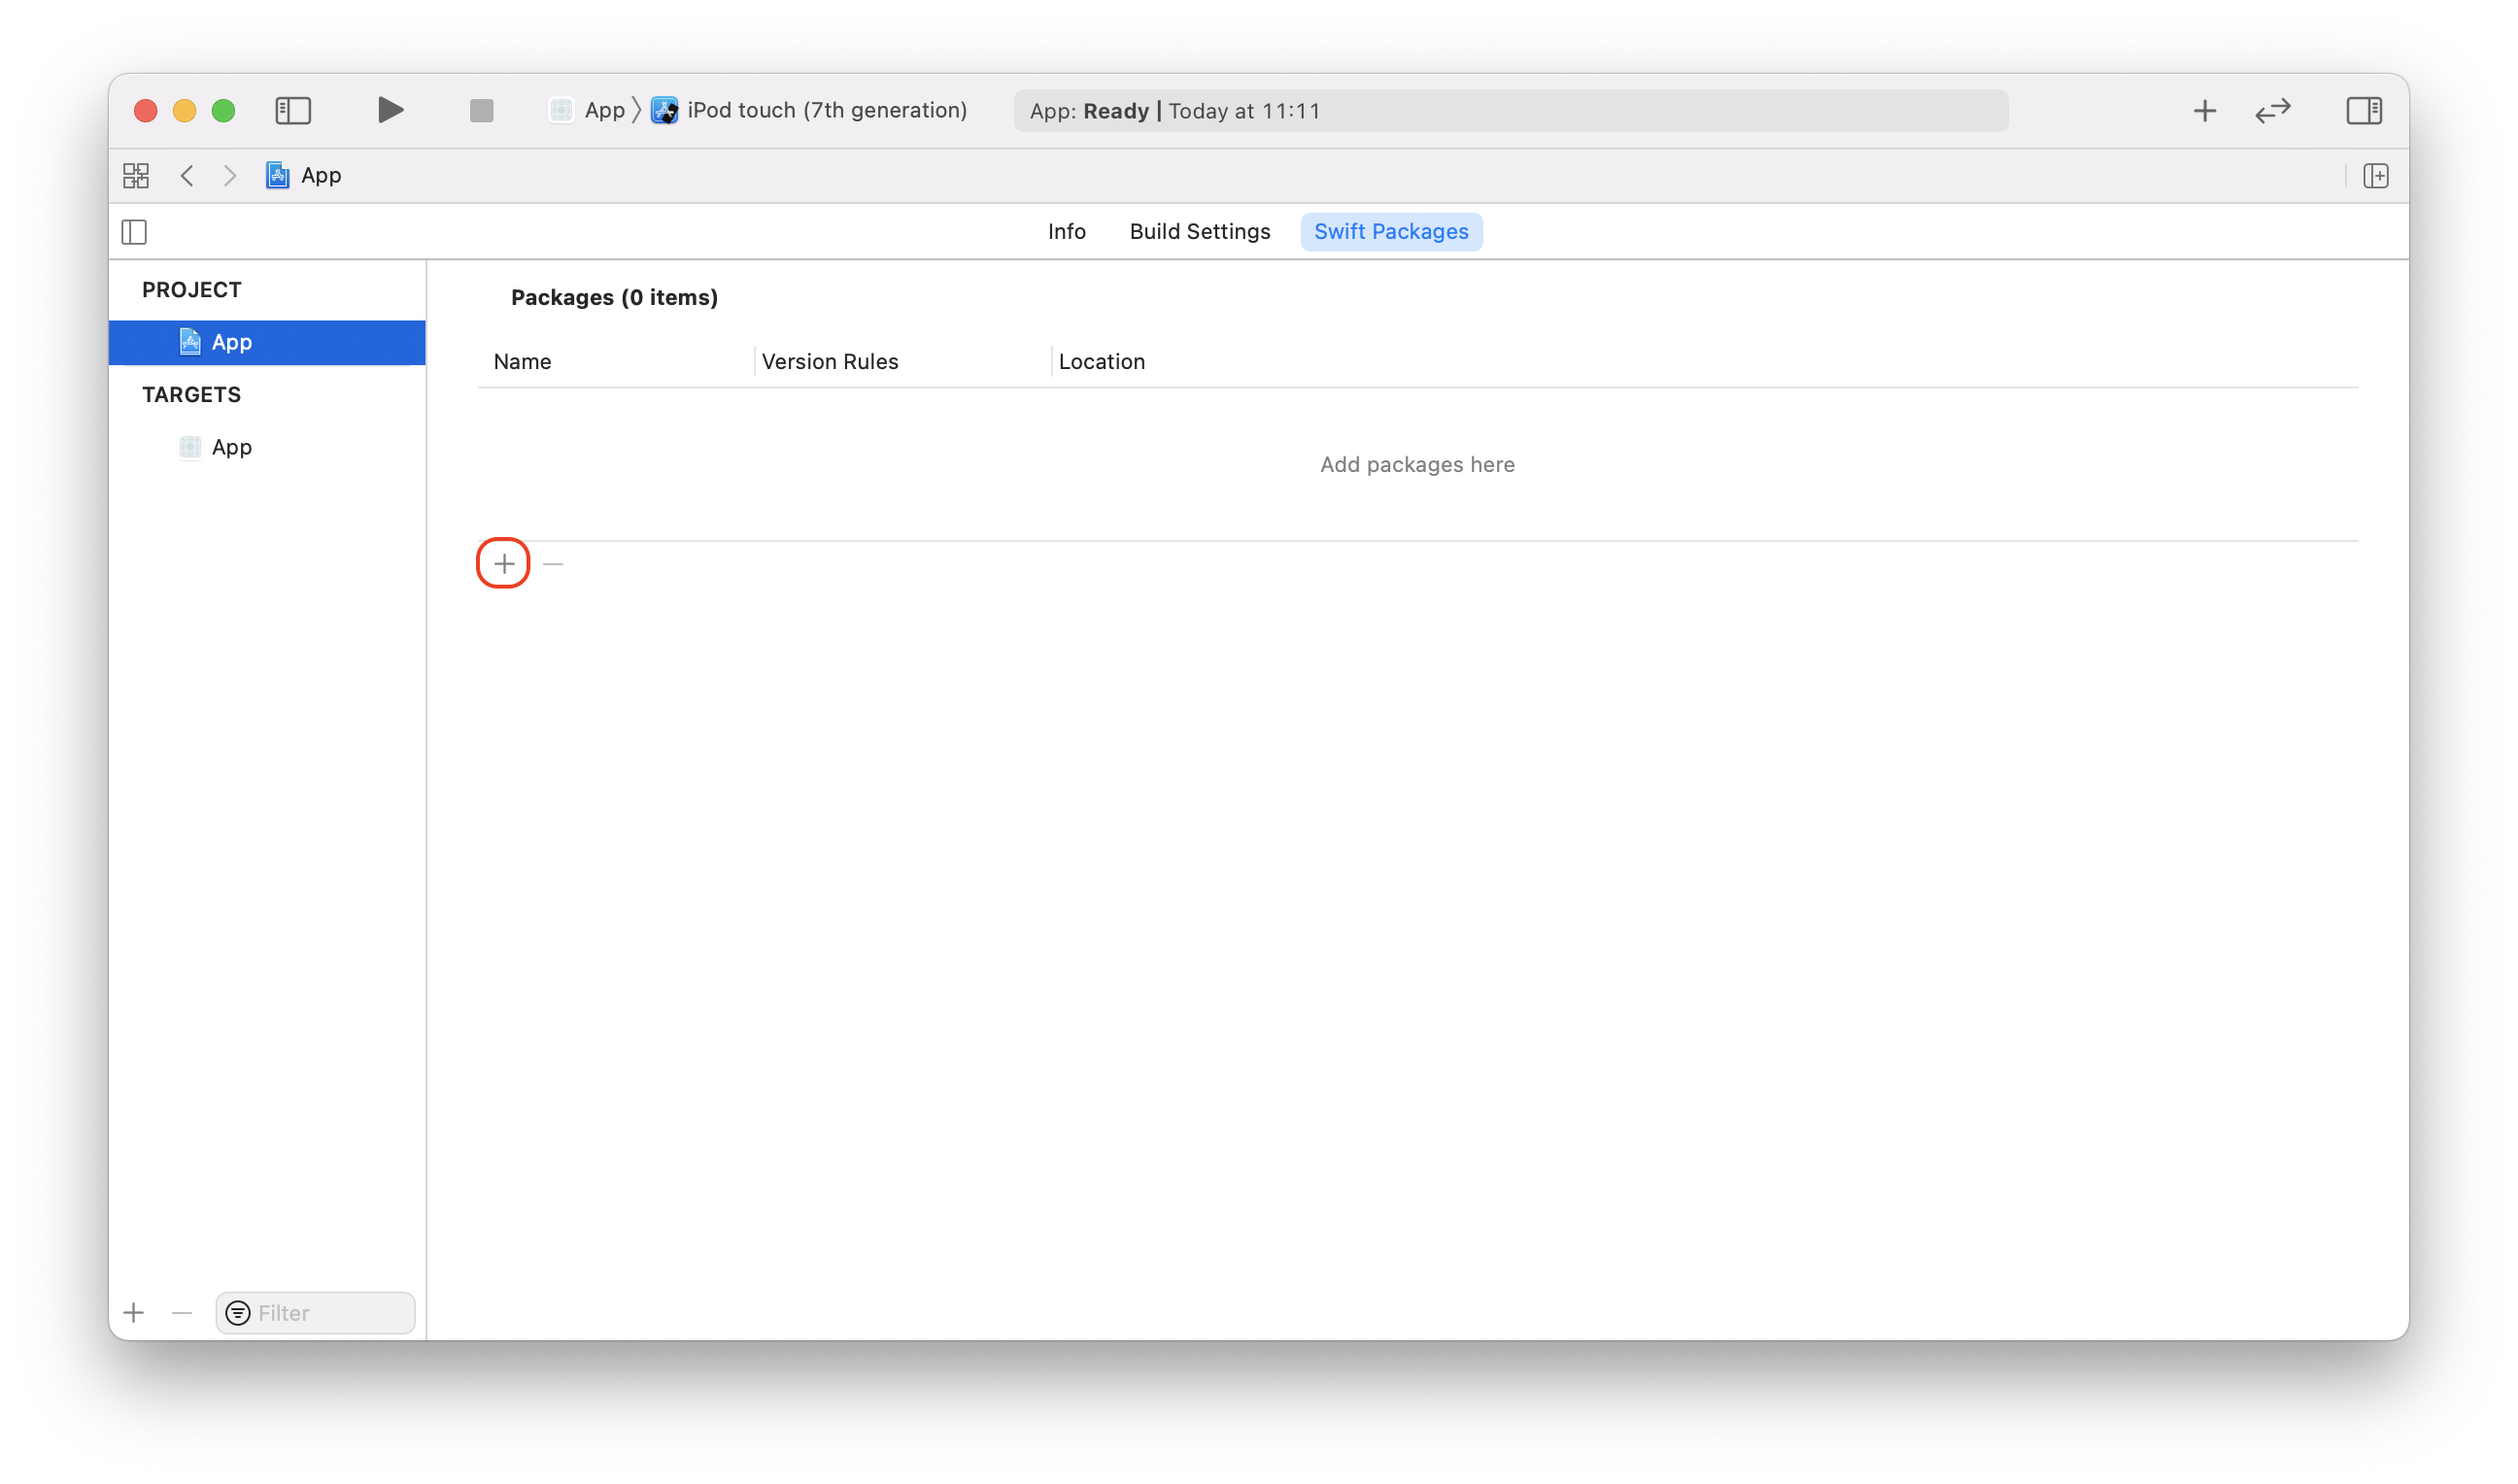
1. Add the dependency to your project. Open your project and navigate to your project’s settings. Select the tab named Swift Packages and click on the add button + at the bottom left.
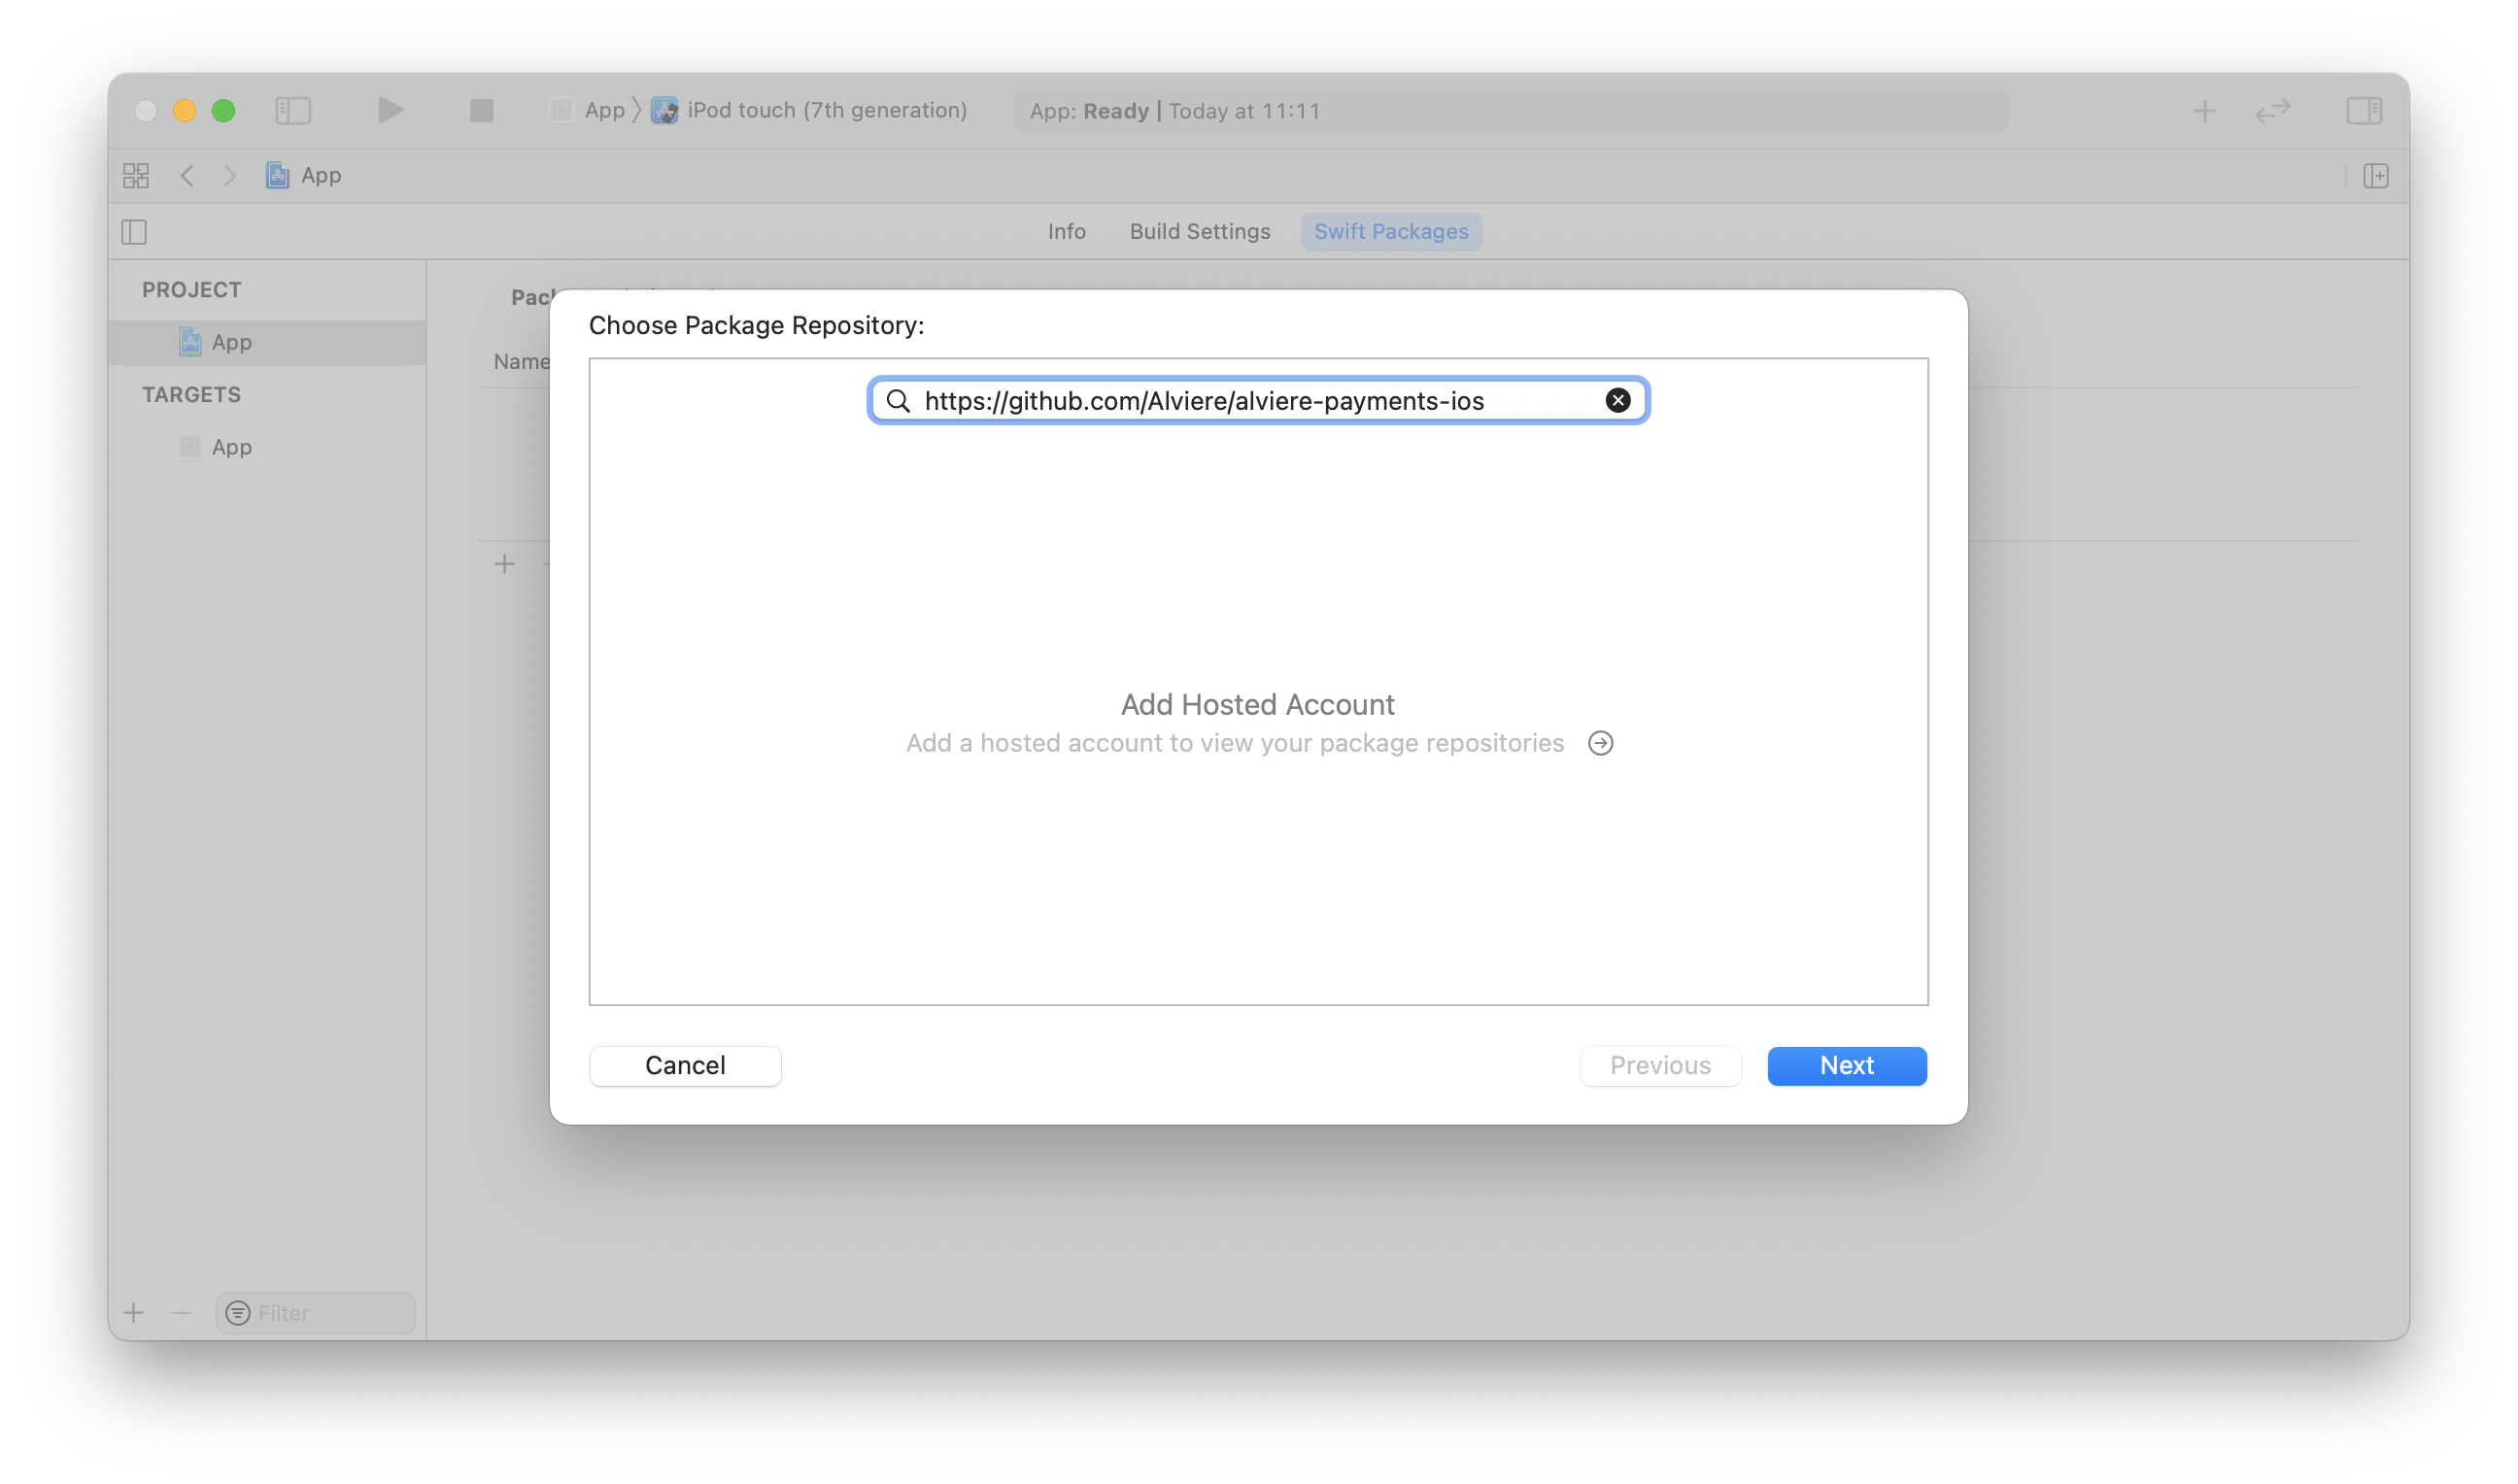
2. Enter the url of Payments SDK for the iOS repository (https://github.com/Alviere/alviere-payments-ios) in the text field and click Next.
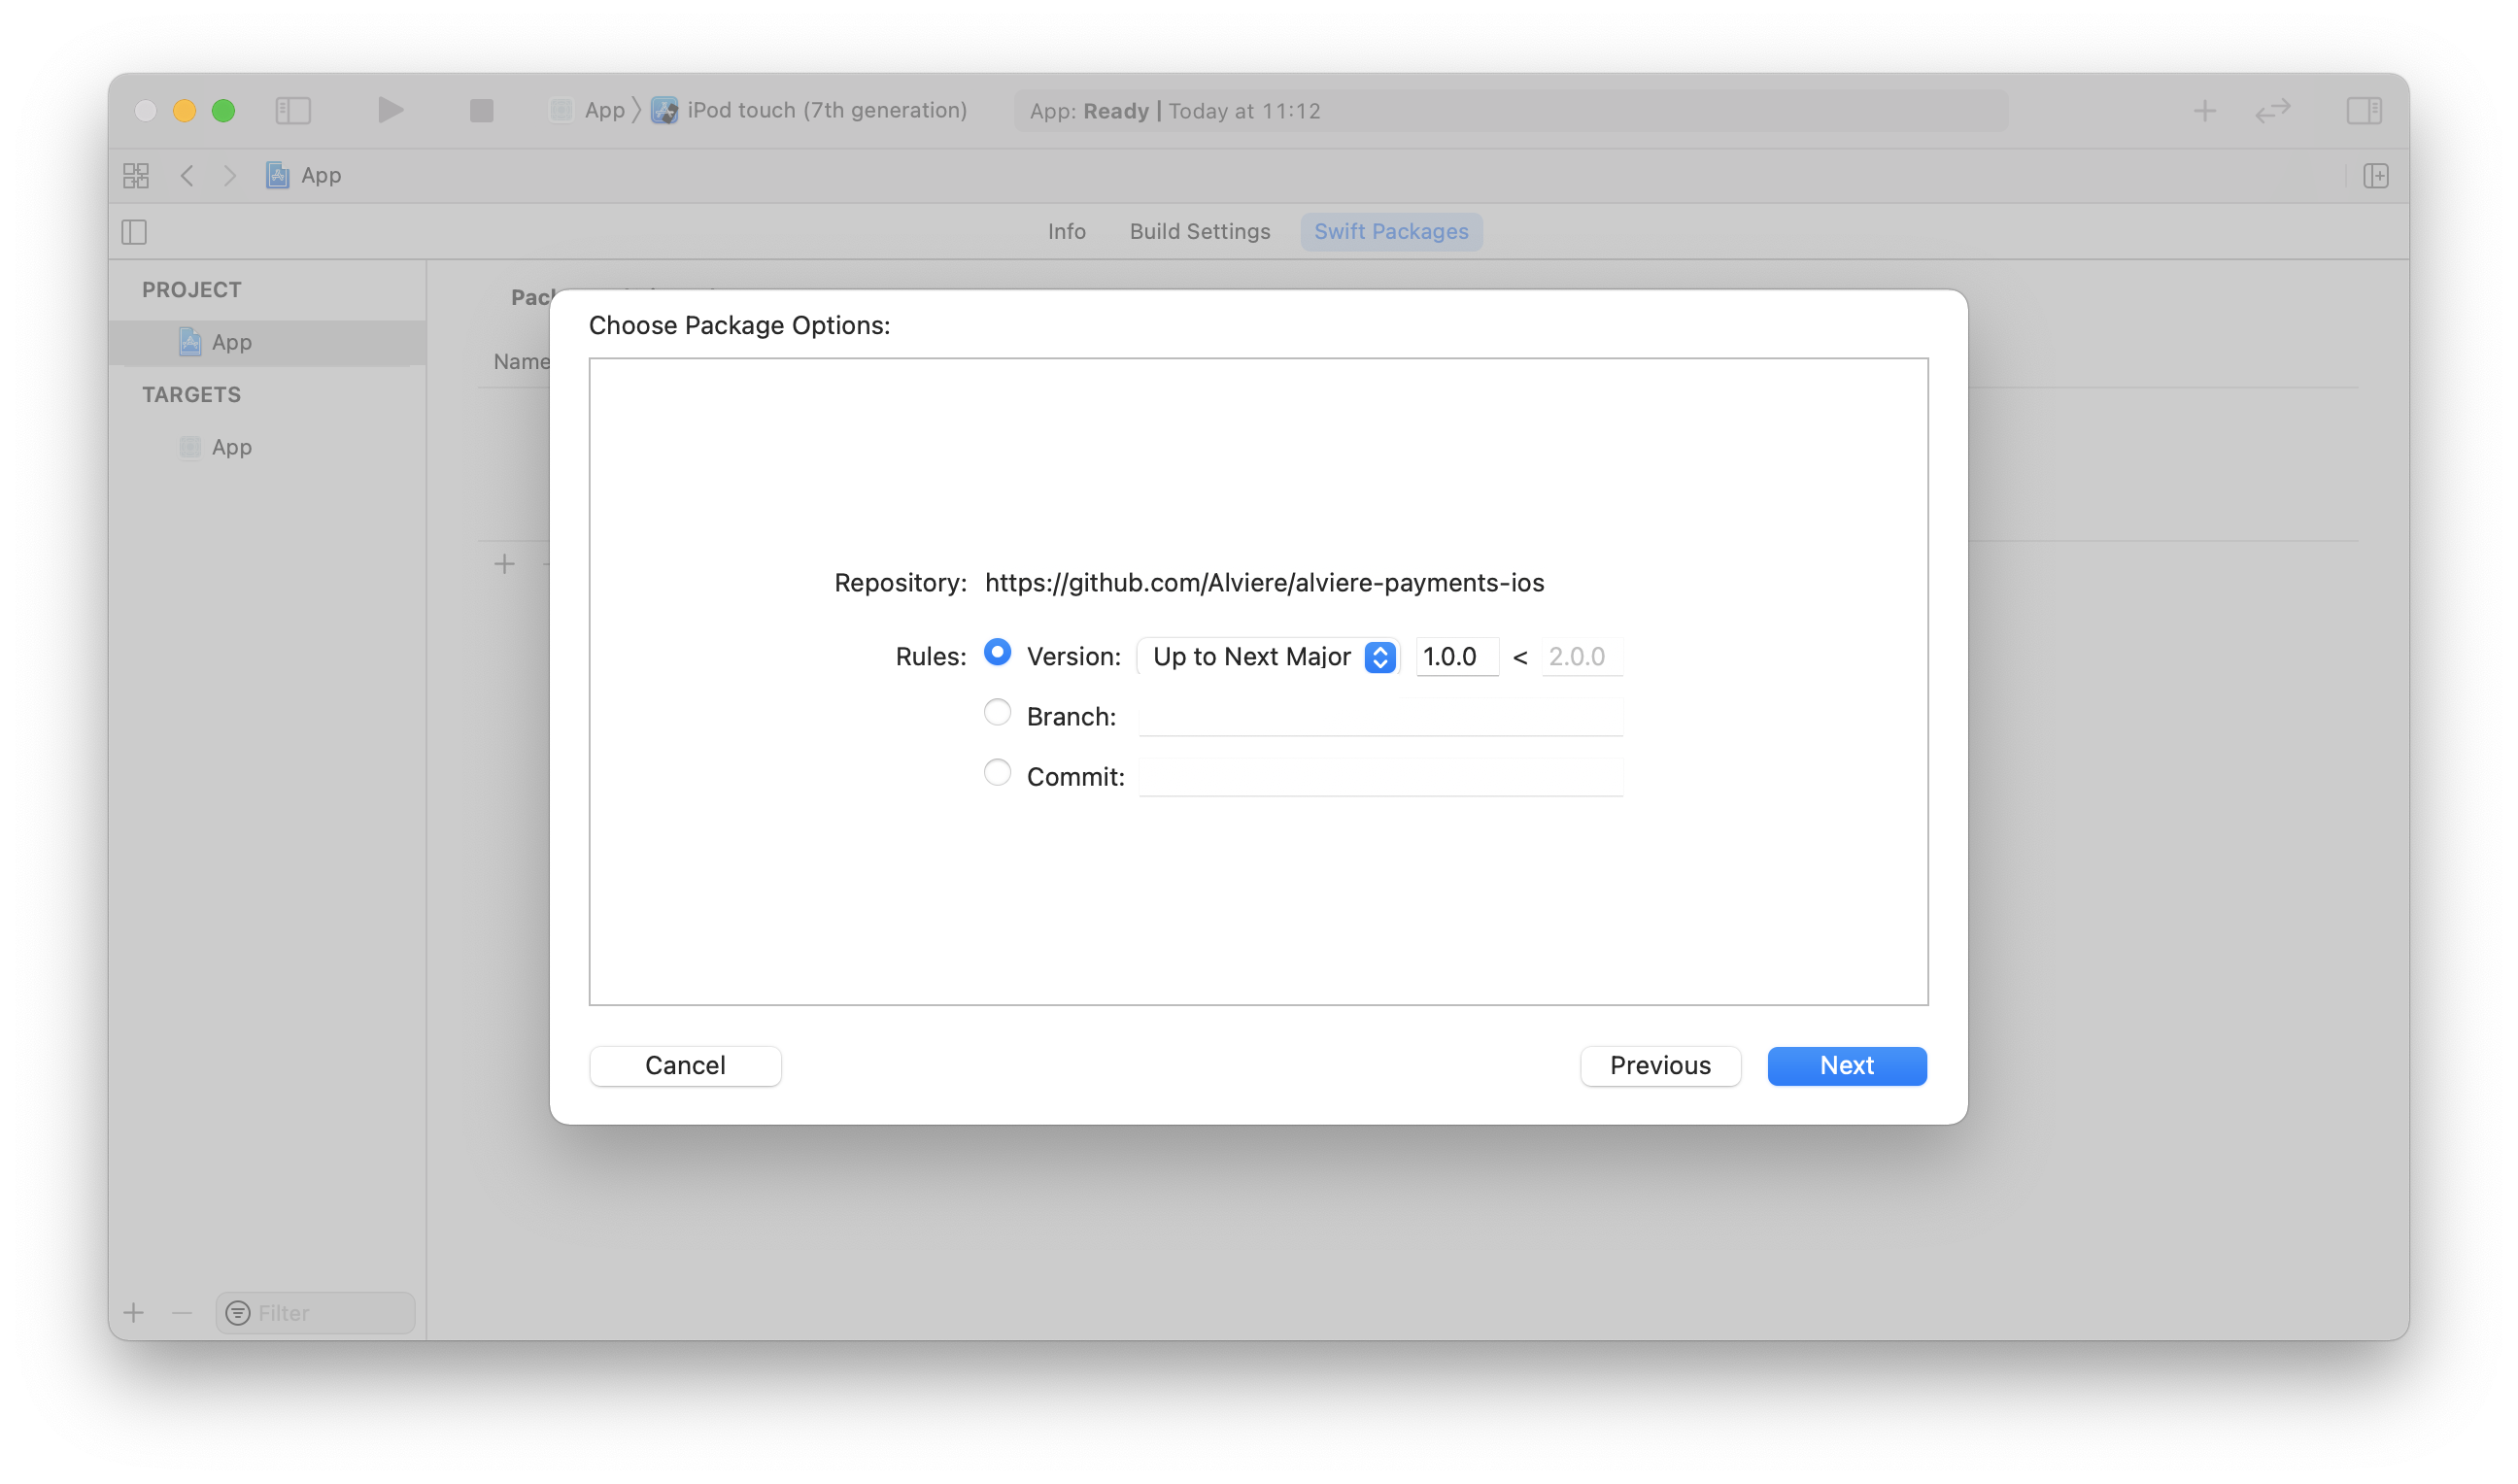
3. On the next screen, select the SDK version and click Next.
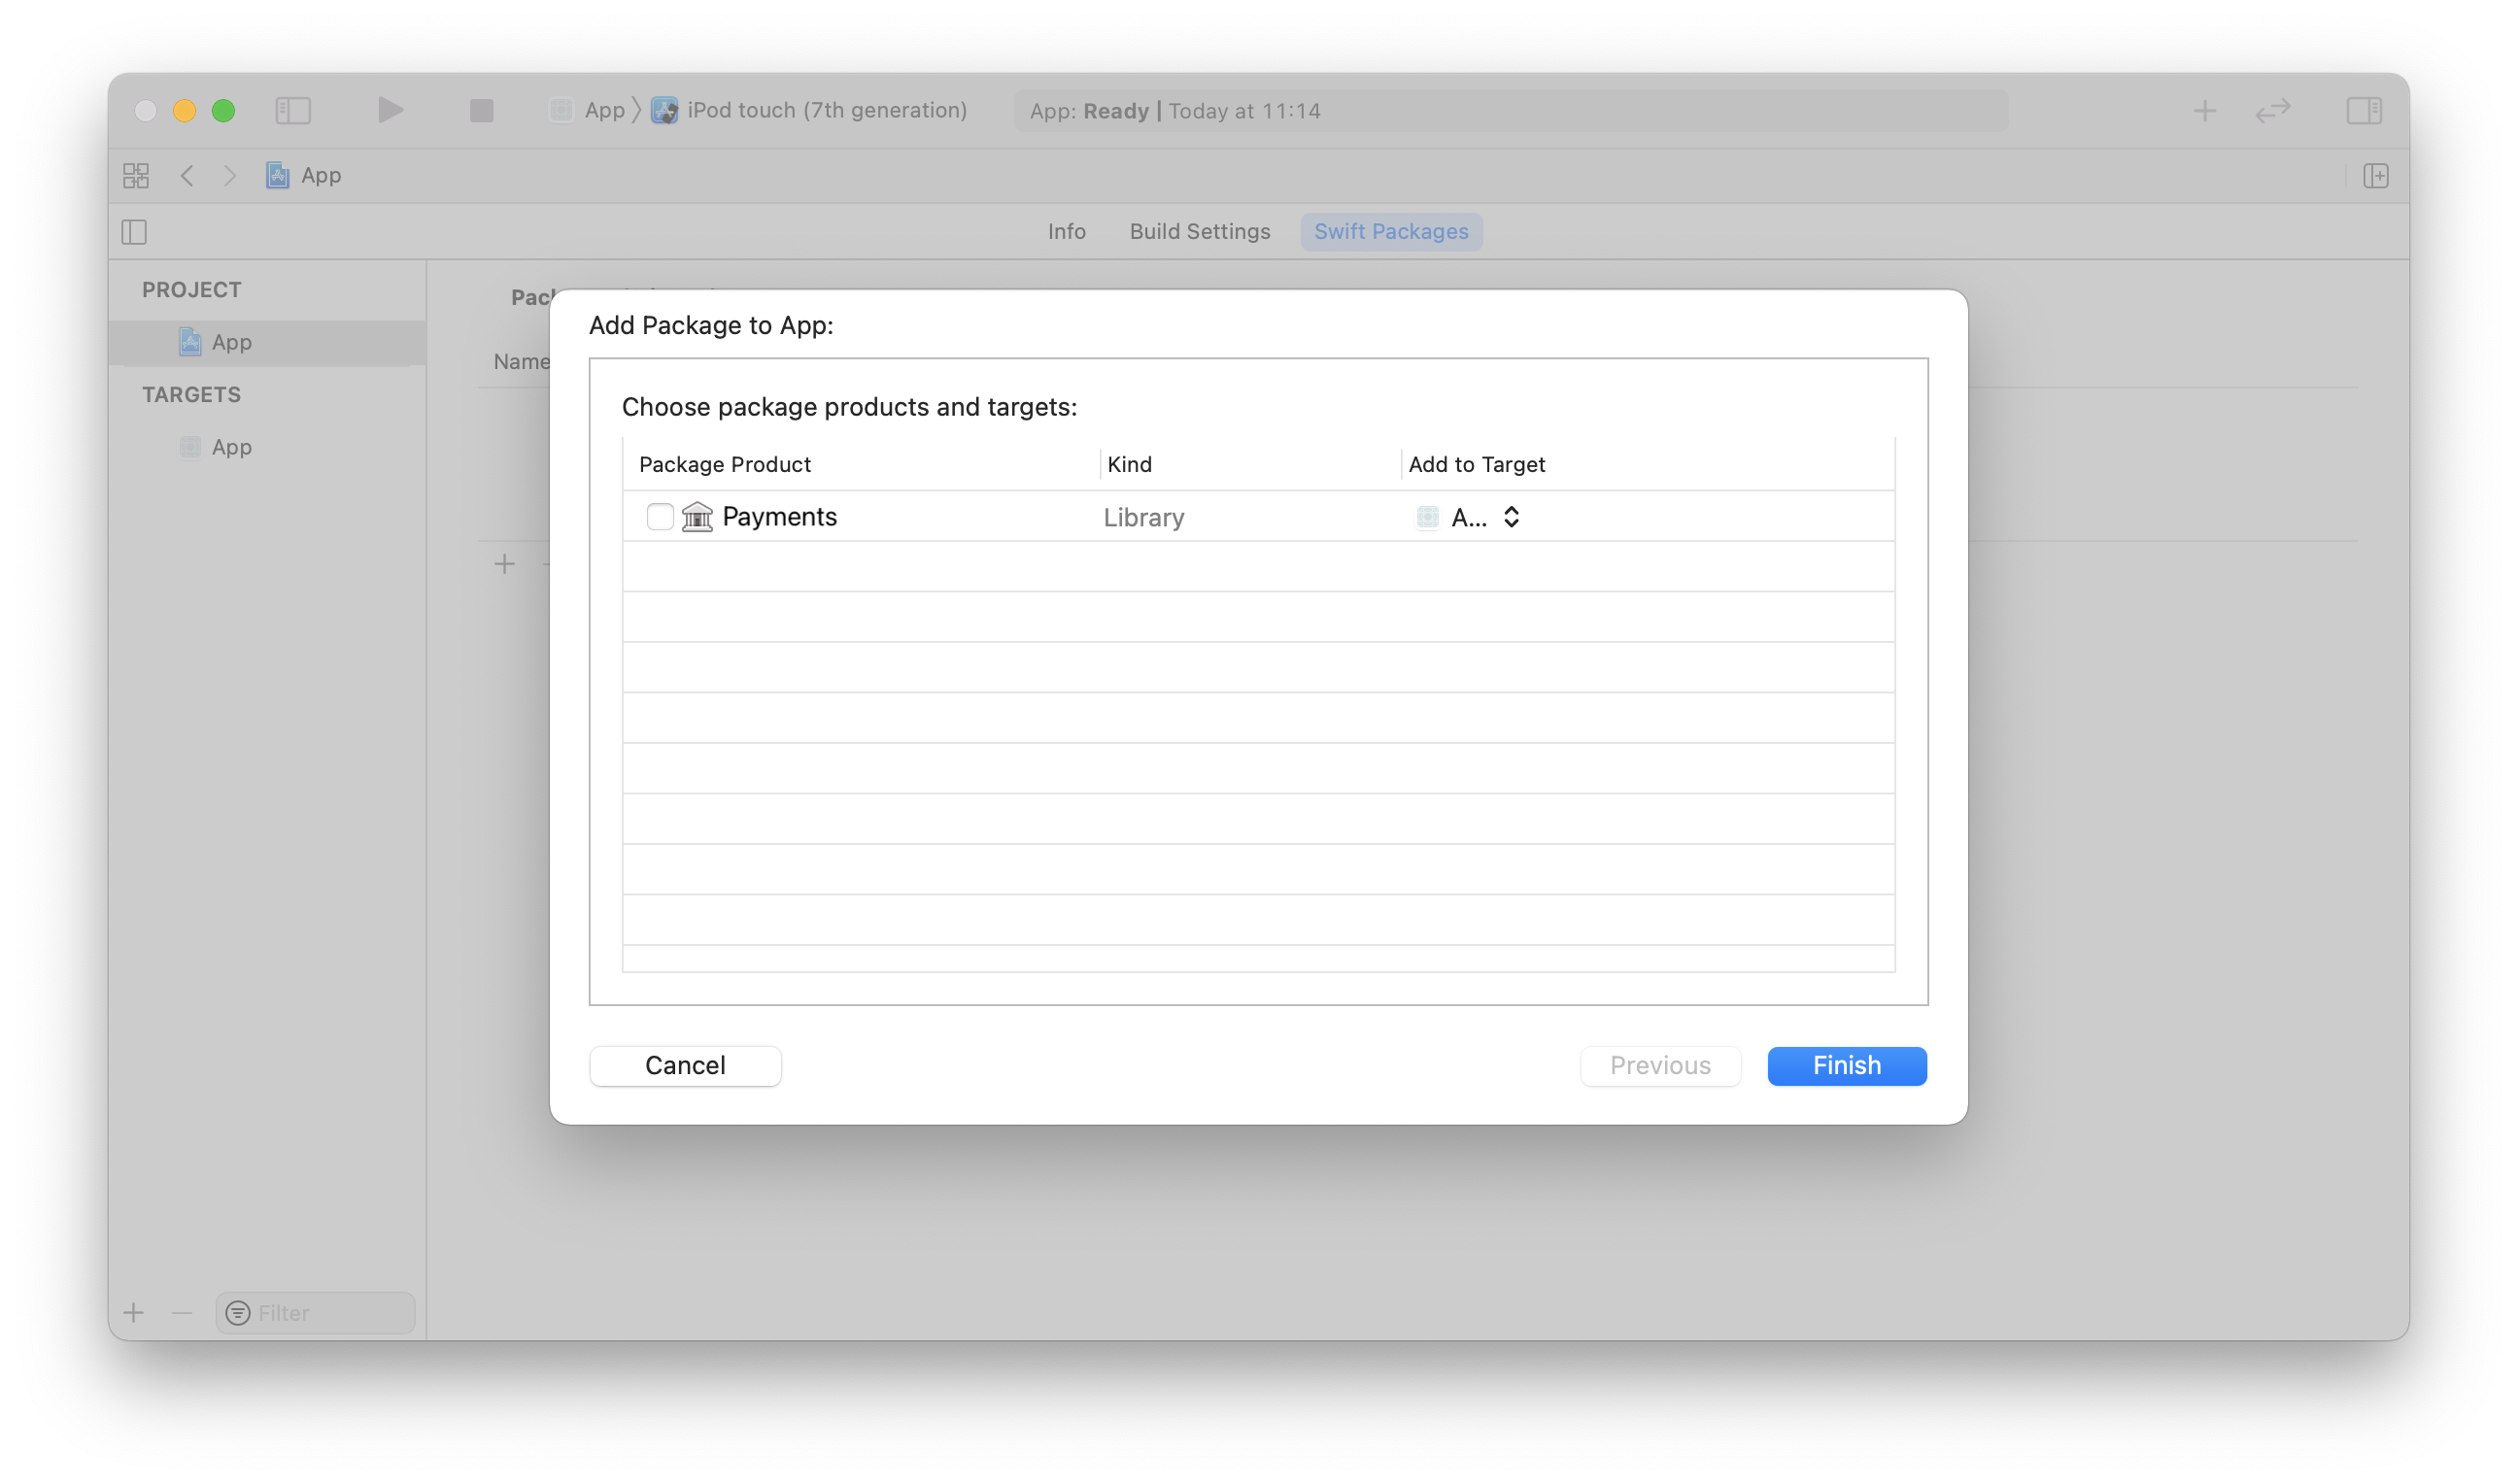
4. Select the Payments package and click Finish.
5. Repeat the same process for AlCore SDK (https://github.com/Alviere/alviere-core-ios). The current version is compatible with AlCore SDK version 0.9.0 and up.
CocoaPods
1. Get the latest version of CocoaPods, if you haven’t already.
2. Create the Podfile by running the following command, if you don’t have one already.
pod init
3. Add this line to your Podfile.
pod 'Payments'
4. Run the following command to install the library. Also, run this to update to newer releases in the future.
pod install
Carthage
1. Get the latest version of Carthage, if you haven’t already.
2. Add the following entries in your Cartfile:
binary https://raw.githubusercontent.com/Alviere/alviere-core-ios/master/AlCore.json
binary https://raw.githubusercontent.com/Alviere/alviere-payments-ios/master/Payments.json
3. Run the following command to download the latest version of the SDK.
carthage update --use-xcframeworks
4. Follow the Manual instructions below to embed the SDK into your project.
Manual
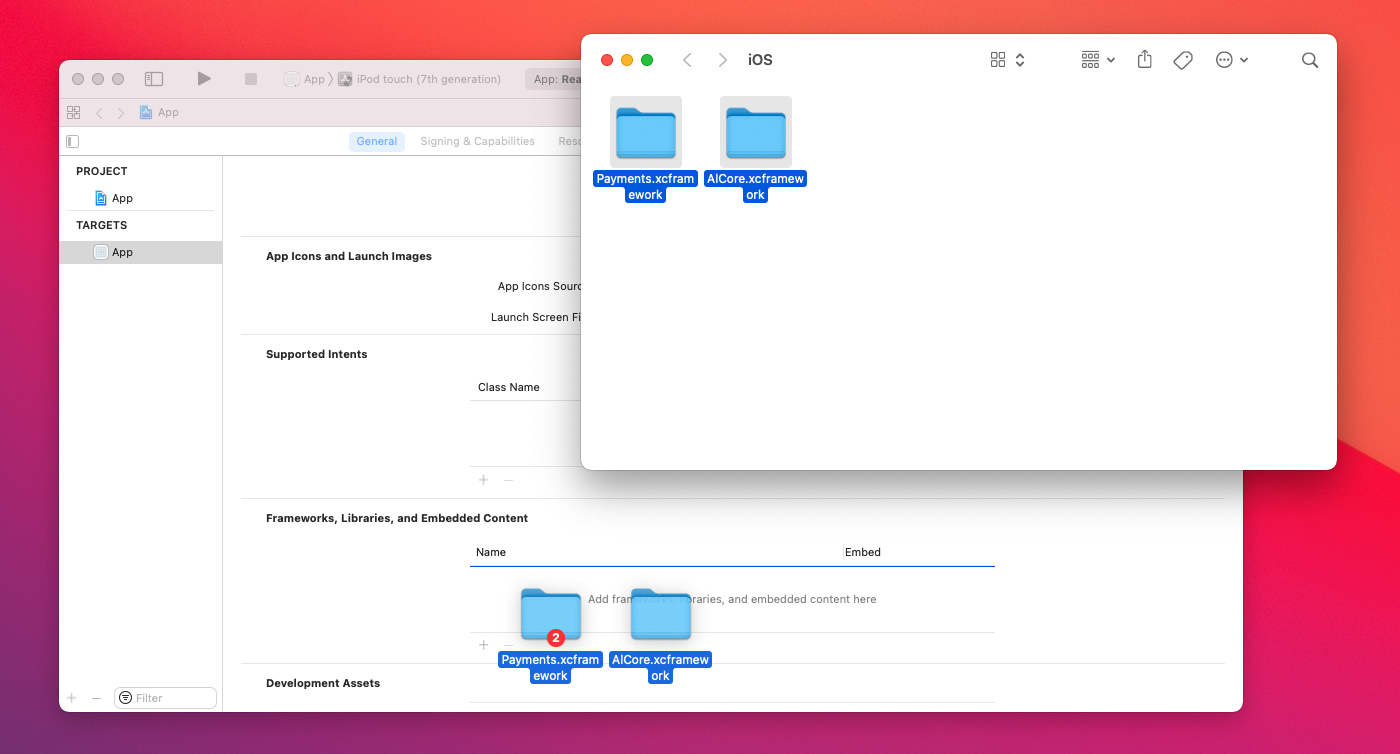
1. Get the latest versions of PaymentsSDK.xcframework and AlCore.xcframework and embed them into your application by dragging and dropping the files onto the Frameworks, Libraries and Embedded Content project section, as shown below.
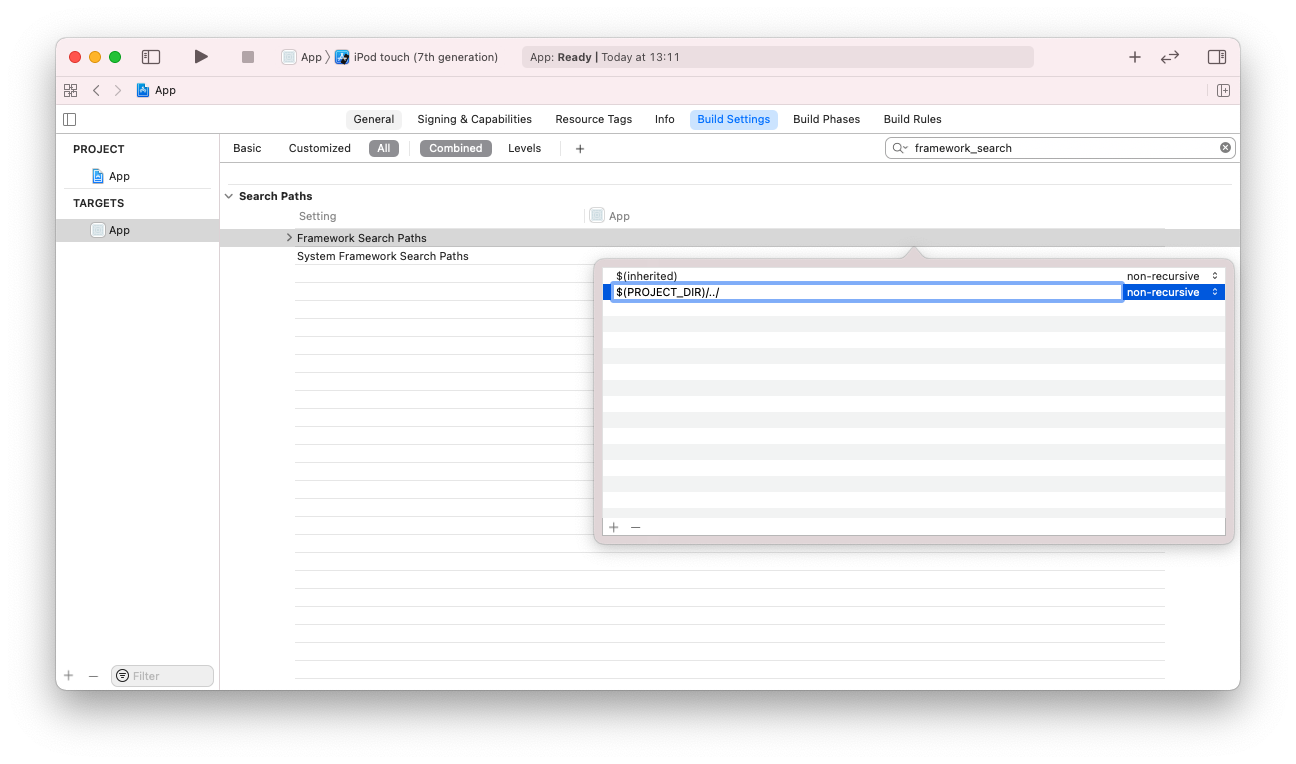
2. Depending on the location of PaymentsSDK.xcframework and AlCore.xcframework on the filesystem you may need to change the Framework Search Paths build setting to avoid the error: fatal error: ‘PaymentsSDK/AlPayments.h’ file not found. For example, the Xcode project below have it set to FRAMEWORK_SEARCH_PATHS = $(PROJECT_DIR)/../ since the xcframeworks files are shared between them and are kept in the directory that also contains the project directories.
Usage
To initialize the Payments SDK for iOS, you need to set the Environment at the entry point of your application. For example, you can do this on your AppDelegate file on the application(_:,didFinishLaunchingWithOptions:) method, as shown below.
import AlCore

...

func application(_ application: UIApplication, didFinishLaunchingWithOptions launchOptions: [UIApplication.LaunchOptionsKey: Any]?) -> Bool {
    // Setup Alviere SDK.
    if !AlCoreSDK.shared.setEnvironment(.sandbox) {
        print("Error initializing SDK.")
    }
    return true
}
After this setup, you just need to import the Payments SDK for iOS on the files where you want to use the features.
import PaymentsSDK
Optionally, if you will use the Deposit Check features you have to adjust your app’s permissions for camera usage. You just need to add the NSCameraUsageDescription in your Info.plist file. Right-click somewhere outside the table and select Add Row. Now add the entries like below.

Or if you prefer to do this step with code, right-click on Info.plist and select Open As > Source Code. Add the lines below somewhere inside the <dict> </dict>.
<!-- Permission to be include in Info.plist -->
<key>NSCameraUsageDescription</key>
<string>This will let you easily take pictures of your Checks so you can deposit them.</string>
When writing the permission request message always follow the iOS Human Design Guidelines as a guideline.
Payment Methods
Create Card
To create a card, use createCard where you will need to pass the auth_token, pass the accountUuid and the CardRequest model with the data.
let request = CardRequest( ... )

let response = try await AlPayments.shared
    .createCard(
        token: authToken,
        accountUuid: accountUuid,
        data: request
    )
This action will return a Card or throw an EventError.
The keys for the EventError metadata field are defined on the Metadata enum.
Update Card
To update a card, use updateCard where you will need to pass the auth_token, pass the paymentMethodUuid and the CardUpdateRequest model with the data.
let request = CardUpdateRequest( ... )

let response = try await AlPayments.shared
    .updateCard(
        token: authToken,
        paymentMethodUuid: paymentMethodUuid,
        data: request
    )
This action will return a Card or throw an EventError.
The keys for the EventError metadata field are defined on the Metadata enum.
List Cards
To list cards, use listCards where you will need to pass the auth_token and pass the accountUuid.
let response = try await AlPayments.shared
    .listCards(
        token: authToken,
        accountUuid: accountUuid,
        query: query
    )
This action will return a Card list or throw an EventError.
The keys for the EventError metadata field are defined on the Metadata enum.
Get Card
To get a card, use getCard where you will need to pass the auth_token, pass the accountUuid and pass the paymentMethodUuid.
let response = try await AlPayments.shared
    .getCard(
        token: authToken,
        accountUuid: accountUuid,
        paymentMethodUuid: paymentMethodUuid
    )
This action will return a Card or throw an EventError.
The keys for the EventError metadata field are defined on the Metadata enum.
Delete Card
To delete a card, use deleteCard where you will need to pass the auth_token, pass the accountUuid and pass the paymentMethodUuid.
try await AlPayments.shared
    .deleteCard(
        token: authToken,
        accountUuid: accountUuid,
        paymentMethodUuid: paymentMethodUuid
    )
This action will not return a response but can throw an EventError.
The keys for the EventError metadata field are defined on the Metadata enum.
Create Bank Account
To create a bank account, use createBankAccount where you will need to pass the auth_token, pass the accountUuid and the BankRequest model with the data.
let request = BankRequest(...)

let response = try await AlPayments.shared
    .createBankAccount(
        token: authToken,
        accountUuid: accountUuid,
        data: request
    )
This action will return a Bank or throw an EventError.
The keys for the EventError metadata field are defined on the Metadata enum.
List Bank Accounts
To list bank accounts, use listBankAccounts where you will need to pass the auth_token and pass the accountUuid.
let response = try await AlPayments.shared
    .listBankAccounts(
        token: authToken,
        accountUuid: accountUuid,
        query: query
    )
This action will return a Bank list or throw an EventError.
The keys for the EventError metadata field are defined on the Metadata enum.
Get Bank Account
To get a bank account, use getBankAccount where you will need to pass the auth_token, pass the accountUuid and pass the paymentMethodUuid.
let response = try await AlPayments.shared
    .getBankAccount(
        token: authToken,
        accountUuid: accountUuid,
        paymentMethodUuid: paymentMethodUuid
    )
This action will return a Bank or throw an EventError.
The keys for the EventError metadata field are defined on the Metadata enum.
Update Bank Account
To update a bank, use updateBankAccount where you will need to pass the auth_token, pass the paymentMethodUuid and the BankUpdateRequest model with the data.
let request = BankUpdateRequest( ... )

let response = try await AlPayments.shared
    .updateBankAccount(
        token: authToken,
        paymentMethodUuid: paymentMethodUuid,
        data: request
    )
This action will return a Bank or throw an EventError.
The keys for the EventError metadata field are defined on the Metadata enum.
Delete Bank Account
To delete a bank account, use deleteBankAccount where you will need to pass the auth_token, pass the accountUuid and pass the paymentMethodUuid.
try await AlPayments.shared
    .deleteBankAccount(
        token: authToken,
        accountUuid: accountUuid,
        paymentMethodUuid: paymentMethodUuid
    )
This action will not return a response but can throw an EventError.
The keys for the EventError metadata field are defined on the Metadata enum.
Plaid Integration
You can also create bank accounts through Plaid Link SDK with the Alviere system.
Create Plaid Bank Account
To create a plaid bank account, use createPlaidBankAccount where you will need to pass the auth_token, pass the accountUuid and the PlaidBankRequest model with the data.
let request = PlaidBankRequest( ... )

let response = try await AlPayments.shared
    .createPlaidBankAccount(
        token: authToken,
        accountUuid: accountUuid,
        data: request
    )
This action will return a Bank or throw an EventError.
The keys for the EventError metadata field are defined on the Metadata enum.
Activate Plaid Bank Account
To activate a plaid bank account, use activatePlaidBankAccount where you will need to pass the auth_token, pass the accountUuid and pass the paymentMethodUuid.
try await AlPayments.shared
    .activatePlaidBankAccount(
        token: authToken,
        accountUuid: accountUuid,
        paymentMethodUuid: paymentMethodUuid
    )
This action will not return a response but can throw an EventError.
The keys for the EventError metadata field are defined on the Metadata enum.
Wallets
List Wallets
To list wallets, use listWallets where you will need to pass the auth_token and pass the accountUuid.
let response = try await AlPayments.shared
    .listWallets(
        token: authToken,
        accountUuid: accountUuid
    )
This action will return a Wallet list or throw an EventError.
The keys for the EventError metadata field are defined on the Metadata enum.
Get Wallet
To get a wallet, use getWallet where you will need to pass the auth_token, pass the accountUuid and pass the walletUuid.
let response = try await AlPayments.shared
    .getWallet(
        token: authToken,
        accountUuid: accountUuid,
        walletUuid: walletUuid
    )
This action will return a Wallet or throw an EventError.
The keys for the EventError metadata field are defined on the Metadata enum.
Load Funds
To load funds, use loadFunds where you will need to pass the auth_token, pass the walletUuid and the LoadFundsRequest model with the data.
let request = LoadFundsRequest( ... )

let response = try await AlPayments.shared
    .loadFunds(
        token: authToken,
        walletUuid: walletUuid,
        data: request
    )
This action will return a Transaction or throw an EventError.
The keys for the EventError metadata field are defined on the Metadata enum.
Withdraw Funds
To withdraw funds, use withdrawFunds where you will need to pass the auth_token, pass the walletUuid and the WithdrawFundsRequest model with the data.
let request = WithdrawFundsRequest( ... )

let response = try await AlPayments.shared
    .withdrawFunds(
        token: authToken,
        walletUuid: walletUuid,
        data: request
    )
This action will return a Transaction or throw an EventError.
The keys for the EventError metadata field are defined on the Metadata enum.
Send Funds
To withdraw funds, use sendFunds where you will need to pass the auth_token, pass the walletUuid and the SendFundsRequest model with the data.
let request = SendFundsRequest( ... )

let response = try await AlPayments.shared
    .sendFunds(
        token: authToken,
        walletUuid: walletUuid,
        data: request
    )
This action will return a Transaction or throw an EventError.
The keys for the EventError metadata field are defined on the Metadata enum.
Transfer Funds
To transfer funds, use transferFunds where you will need to pass the auth_token, pass the walletUuid and the TransferFundsRequest model with the data.
let request = TransferFundsRequest( ... )

let response = try await AlPayments.shared
    .transferFunds(
        token: authToken,
        walletUuid: walletUuid,
        data: request
    )
This action will return a Transaction or throw an EventError.
The keys for the EventError metadata field are defined on the Metadata enum.
Get Wallet Statement
To transfer funds, use getWalletStatement where you will need to pass the auth_token, pass the walletUuid and pass the WalletStatementQuery model with the parameters.
let response = try await AlPayments.shared
    .getWalletStatement(
        token: authToken,
        walletUuid: walletUuid,
        query: WalletStatementQuery(month: 1, year: 2025)
    )
This action will return a WalletStatementResponse or throw an EventError.
The keys for the EventError metadata field are defined on the Metadata enum.
Transactions
Get Transaction Limits
To get transaction limits, use getTransactionLimits where you will need to pass the auth_token and pass the TransactionLimitsQuery model with the parameters.
let response = try await AlPayments.shared
    .getTransactionLimits(
        token: authToken,
        query: TransactionLimitsQuery(...)
    )
This action will return a TransactionLimits list or throw an EventError.
The keys for the EventError metadata field are defined on the Metadata enum.
List Transactions
To list transactions, use listTransactions where you will need to pass the auth_token and pass the TransactionsQuery model with the parameters.
let response = try await AlPayments.shared
    .listTransactions(
        token: authToken,
        query: TransactionsQuery(...)
    )
This action will return a Transaction list or throw an EventError.
The keys for the EventError metadata field are defined on the Metadata enum.
List Child Transactions
To list transactions, use listWalletTransactions where you will need to pass the auth_token and pass the transactionUuid.
let response = try await AlPayments.shared
    .listChildTransactions(
        token: authToken,
        transactionUuid: transactionUuid
    )
This action will return a Transaction list or throw an EventError.
The keys for the EventError metadata field are defined on the Metadata enum.
Get Transaction Details
To get a transaction’s details, use getTransactionDetails where you will need to pass the auth_token and pass the transactionUuid.
let response = try await AlPayments.shared
    .getTransactionDetails(
        token: authToken,
        transactionUuid: transactionUuid
    )
This action will return a Transaction or throw an EventError.
The keys for the EventError metadata field are defined on the Metadata enum.
Get Receipt
To get a receipt, use getReceipt where you will need to pass the auth_token and pass the transactionUuid.
let response = try await AlPayments.shared
    .getReceipt(
        token: authToken,
        transactionUuid: transactionUuid
    )
This action will return a Receipt or throw an EventError.
The keys for the EventError metadata field are defined on the Metadata enum.
Cancel Transaction
To cancel a transaction, use cancelTransaction where you will need to pass the auth_token and pass the transactionUuid.
try await AlPayments.shared
    .cancelTransaction(
        token: authToken,
        transactionUuid: transactionUuid
    )
This action will not return a response but can throw an EventError.
The keys for the EventError metadata field are defined on the Metadata enum.
Check deposits
Deposit Check
To deposit a check, use depositCheck where you will need to pass the auth_token, pass the walletUuid and the DepositCheckRequest model with the data.
let request = DepositCheckRequest( ... )

let response = try await AlPayments.shared
    .depositCheck(
        token: authToken,
        walletUuid: walletUuid,
        data: request
    )
This action will return a Check or throw an EventError.
The keys for the EventError metadata field are defined on the Metadata enum.
Deposit Check UI Presentation
Be aware that you should request camera permission before presenting the deposit check UI or it will be requested when presented.
To deposit a check, use createCheckDepositView where you will need to pass the auth_token, pass the cameraToken, pass the walletUuid, pass the DepositCheckRequest model with the data and pass the onCompletion handler.
let cameraToken = try await AlCore.shared.getCameraToken(
    token: token,
    accountUUID: accountUUID
)
let request = DepositCheckRequest( ... )

struct MyView: View {
    var body: some View {
        AlPayments.userInterface.createCheckDepositView(
            token: authToken,
            cameraToken: cameraToken,
            walletUuid: walletUuid,
            data: request,
            overlay: nil, // Optional custom overlay.
            loading: nil, // Optional custom loading.
            failure: nil // Optional custom error.
        ) {
            switch $0 {
            case let .success(check):
                // Handle success.
            case let .failure(error):
                // Handle error
            }
        }
    }
}
Capture Check UI Presentation
Be aware that you should request camera permission before presenting the capture check UI or it will be requested when presented.
To capture a check, use createCaptureCheckView where you will need to pass the cameraToken, pass the cameraConfig and pass the onCompletion handler.
let cameraToken = try await AlCore.shared.getCameraToken(accountUUID: accountUUID)

struct MyView: View {
    var body: some View {
        AlPayments.userInterface.createCaptureCheckView(
            cameraToken: cameraToken,
            cameraConfig: cameraConfig,
            overlay: nil // Optional custom overlay.
        ) {
            switch $0 {
            case let .success(capture):
                // Handle success.
            case let .failure(error):
                // Handle error
            }
        }
    }
}
Overlay Customization
To customize the Overlay you can provide a ALCameraOverlayStyle implementation.
class MyOverlayStyle: ALCameraOverlayStyle {
    func makeTitle(content: Content) -> some View {
        // Customize content.
    }

    func makeDescription(content: Content) -> some View {
        // Customize content.
    }

    func makeStep(content: Content) -> some View {
        // Customize content.
    }

    func makeHint(content: Content) -> some View {
        // Customize content.
    }

    func makeSuccess(content: Content) -> some View {
        // Customize content.
    }

    func makeAcceptButton(content: Content) -> some View {
        // Customize content.
    }

    func makeRetakeButton(content: Content) -> some View {
        // Customize content.
    }

    func makeShutterButton(content: Content) -> some View {
        // Customize content.
    }

    func makeFlashButton(content: Content) -> some View {
       // Customize content.
    }

    func makeCloseButton(content: Content) -> some View {
        // Customize content.
    }
}

ALCameraOverlayView()
    .alCameraOverlayStyle(MyOverlayStyle())
You can also implement your own overlay. An ALCameraContext environment object with all the data and bindings required to create the overlay will be provided.
struct MyOverlayView: View {
    @EnvironmentObject
    var context: ALCameraContext

    var body: some View {
        // Implement overlay here.
    }
}
To provide a custom overlay configuration you can create a ALCameraConfiguration with your overlay configuration. An ALCameraContext environment object with all the data and bindings required to create the overlay will be provided.
struct MyFrameView: View {
    @EnvironmentObject
    var context: ALCameraContext

    var body: some View {
        // Implement frame here.
    }
}

var cameraConfig = ALCameraConfiguration.checkFront
cameraConfig.overlay.title = "my_title_string_key"
cameraConfig.overlay.description = "my_description_string_key"
cameraConfig.overlay.frame = MyFrameView()

AlPayments.userInterface.createCaptureCheckView(
    cameraToken: cameraToken,
    cameraConfig: cameraConfig
) { ... }
Loading Customization
To customize the Loading you can provide a custom view.
struct MyLoadingView: View {
    var body: some View {
        // Implement loading here.
    }
}
Failure Customization
To customize the Failure you can provide a ALFailureStyle implementation.
class MyFailureStyle: ALFailureStyle {
    func makeMessage(content: Content) -> some View {
        // Customize content.
    }

    func makeRetryButton(content: Content) -> some View {
        // Customize content.
    }

    func makeCancelButton(content: Content) -> some View {
        // Customize content.
    }
}

ALFailureView()
    .alFailureStyle(MyFailureStyle())
You can also implement your own failure. An ALFailureContext environment object with all the data and bindings required to create the failure will be provided.
struct MyFailureView: View {
    @EnvironmentObject
    var context: ALFailureContext

    var body: some View {
        // Implement failure here.
    }
}
UI Localization
To localize the UI you will need to create a ALCameraConfiguration with your bundle and string table.
The keys you need to provide are listed in Text and Localization.
var cameraConfig = ALCameraConfiguration.checkFront
cameraConfig.bundle.bundle = myBundle
cameraConfig.bundle.table = "myStringsCatalog"

AlPayments.userInterface.createCaptureCheckView(
    cameraToken: cameraToken,
    cameraConfig: cameraConfig
) { ... }
List Checks
To list checks, use listChecks where you will need to pass the auth_token and pass the walletUuid.
let response = try await AlPayments.shared
    .listChecks(
        token: authToken,
        walletUuid: walletUuid,
        query: query
    )
This action will return a Check list or throw an EventError.
The keys for the EventError metadata field are defined on the Metadata enum.
Get Check
To get a check, use getCheck where you will need to pass the auth_token and pass the checkUuid.
let response = try await AlPayments.shared
    .getCheck(
        token: authToken,
        checkUuid: checkUuid
    )
This action will return a Check or throw an EventError.
The keys for the EventError metadata field are defined on the Metadata enum.
Cash Loading
List Cash Loading Locations
To list cash loading locations, use listCashLoadingLocations where you will need to pass the auth_token and pass the CashLoadingLocationsQuery model with the parameters.
let response = try await AlPayments.shared
    .listCashLoadingLocations(
        token: authToken,
        query: CashLoadingLocationsQuery(...)
    )
This action will return a CashLoadingLocation list or throw an EventError.
The keys for the EventError metadata field are defined on the Metadata enum.
Generate Cash Loading Barcode
To list cash loading locations, use generateCashLoadingBarcode where you will need to pass the auth_token and the CashLoadingBarcodeRequest model with the data.
let response = try await AlPayments.shared
    .generateCashLoadingBarcode(
        token: authToken,
        data: CashLoadingBarcodeRequest(...)
    )
This action will return a CashLoadingBarcode? list or throw an EventError.
The keys for the EventError metadata field are defined on the Metadata enum.
Text and Localization
The Payments SDK for iOS allows you to customize the UI text. To do so, you will need to redefine the localization key that you want to change on your Localizable.strings file. The next section details a list of the current localization keys. Currently, the SDK only provides english localization.
Localization Keys
| Key | English Value |
|---|---|
| alviere_sdk_camera_check_back | Check back |
| alviere_sdk_camera_check_front | Check front |
| alviere_sdk_camera_failure_view_cancel | Cancel |
| alviere_sdk_camera_failure_view_message | An error occurred |
| alviere_sdk_camera_failure_view_retry | Try again |
| alviere_sdk_camera_hint_angle_too_large | Angle too large |
| alviere_sdk_camera_hint_busy_background | Busy background |
| alviere_sdk_camera_hint_data_obstructed | Data obstructed |
| alviere_sdk_camera_hint_glare | Reduce glare |
| alviere_sdk_camera_hint_hold_steady | Hold still |
| alviere_sdk_camera_hint_low_contrast | Low contrast |
| alviere_sdk_camera_hint_not_check_back | Not check back |
| alviere_sdk_camera_hint_not_check_front | Not check front |
| alviere_sdk_camera_hint_not_sharp | Not sharp |
| alviere_sdk_camera_hint_nothing | Nothing detected |
| alviere_sdk_camera_hint_rotation | Reduce rotation |
| alviere_sdk_camera_hint_too_bright | Too bright |
| alviere_sdk_camera_hint_too_close | Too close |
| alviere_sdk_camera_hint_too_dim | Too dim |
| alviere_sdk_camera_hint_too_far | Too far |
| alviere_sdk_camera_preview_accept | Accept photo |
| alviere_sdk_camera_preview_retake | Retake |
| alviere_sdk_camera_preview_success | Success |
| alviere_sdk_camera_preview_title | Photo preview |
| alviere_sdk_camera_step %lld %lld | Step %1$lld of %2$lld |