 View on GitHub
Accounts SDK for iOS
The Accounts SDK is a solution to ease the integration with the Alviere services.
- Features
- Requirements
- Installation
- Usage
- Fraud Prevention Service
- Text and Localization
Features
- Account Management
- Account Addresses Management
- Account Dossiers Management
Requirements
- iOS 13.0+
- Xcode 15+
- Swift 5.5+
Installation
Swift Package Manager
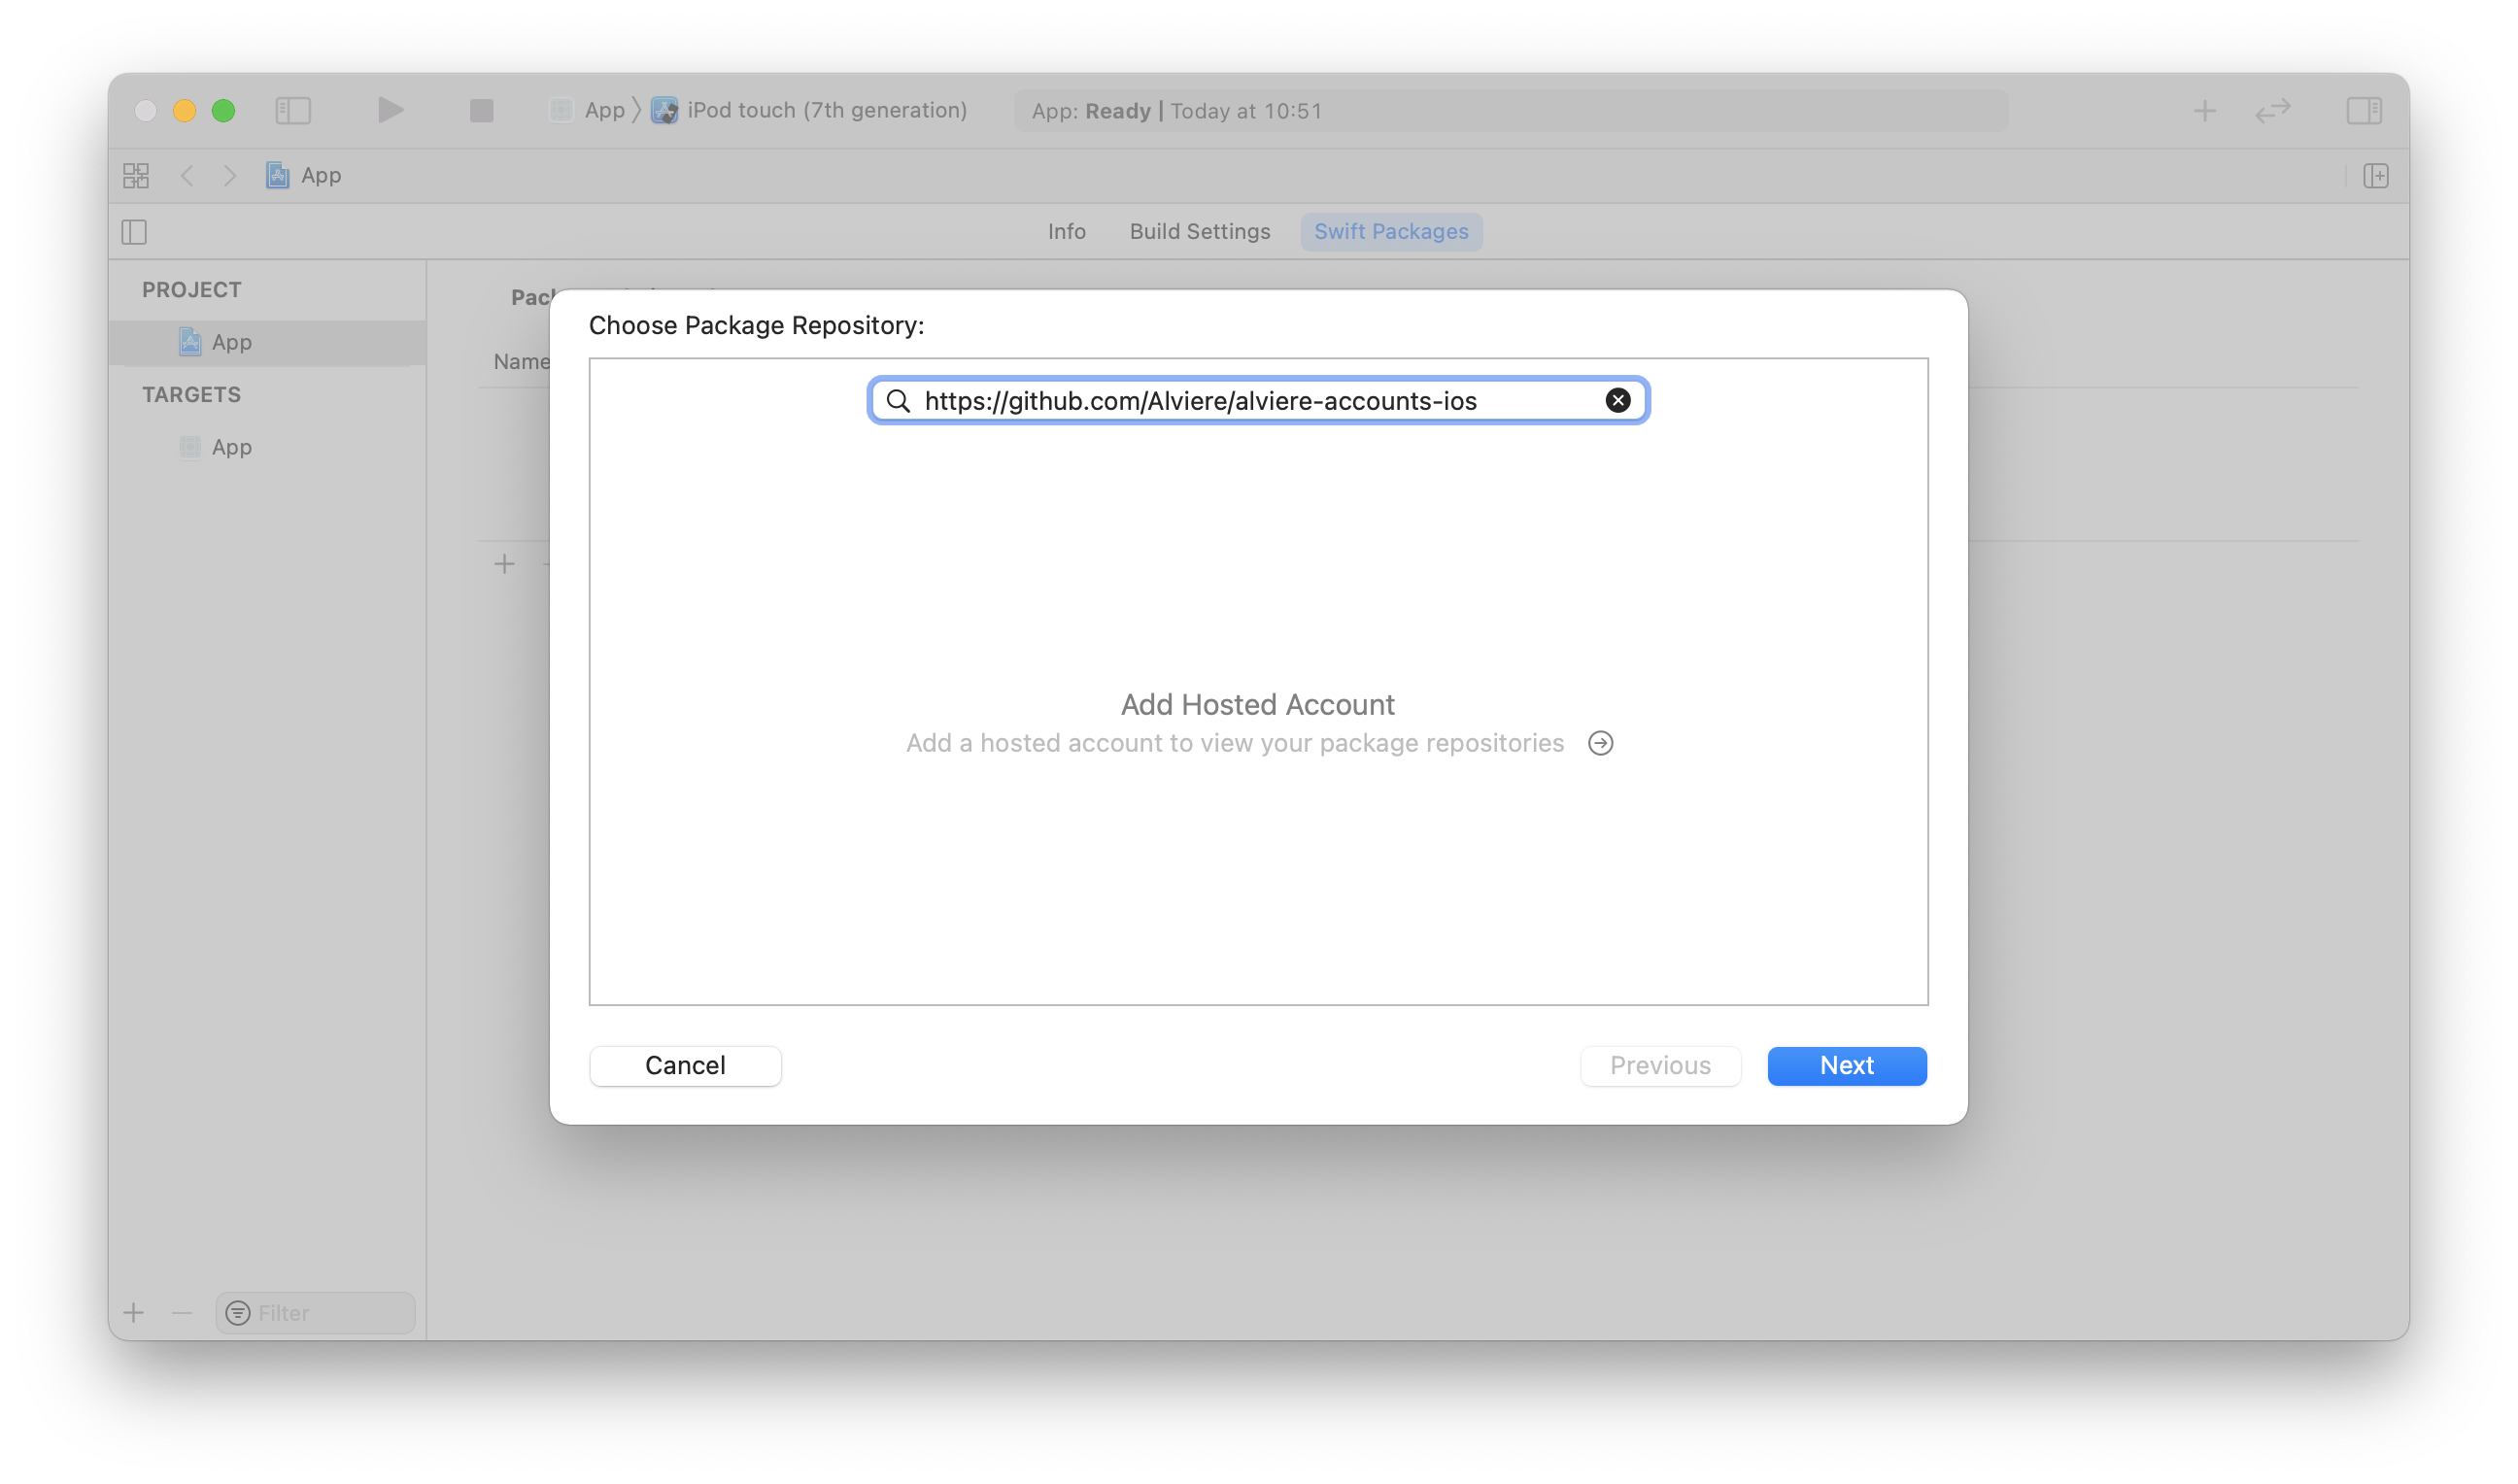
1. Add the dependency to your project. Open your project and navigate to your project’s settings. Select the tab named Swift Packages and click on the add button + at the bottom left.

2. Enter the url of Accounts SDK for the iOS repository (https://github.com/Alviere/alviere-accounts-ios) in the text field and click Next.
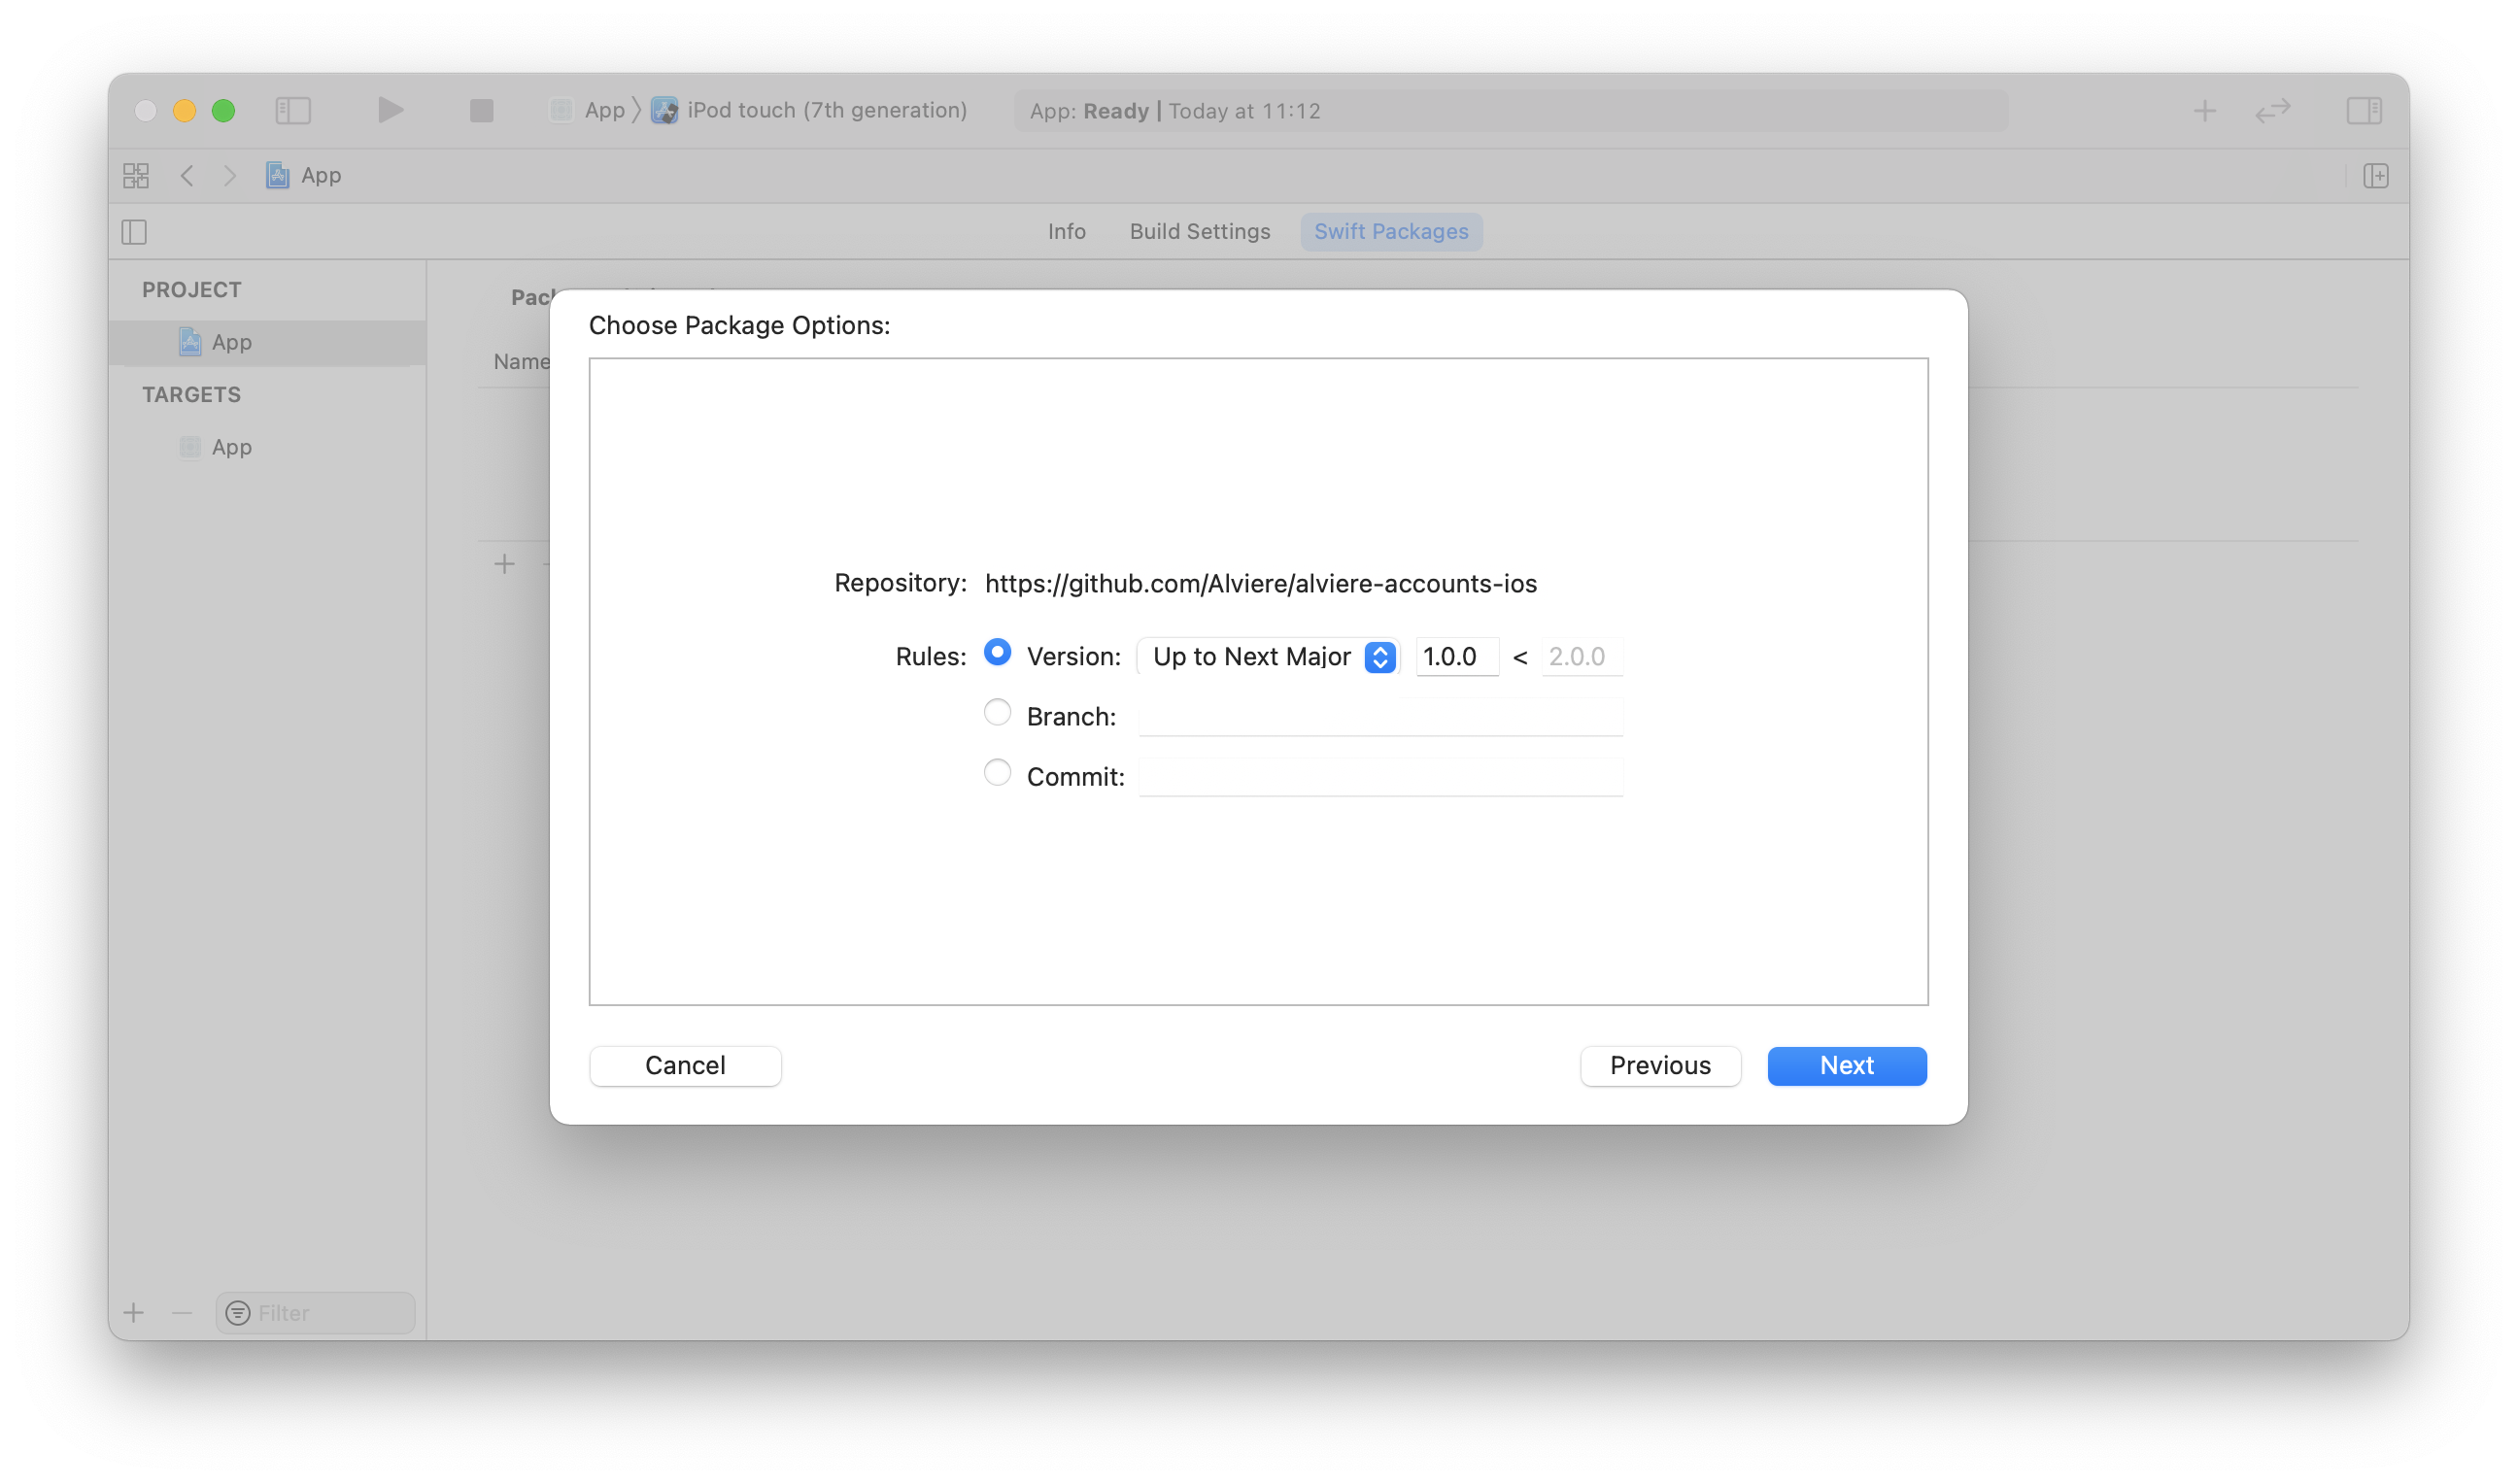
3. On the next screen, select the SDK version and click Next.
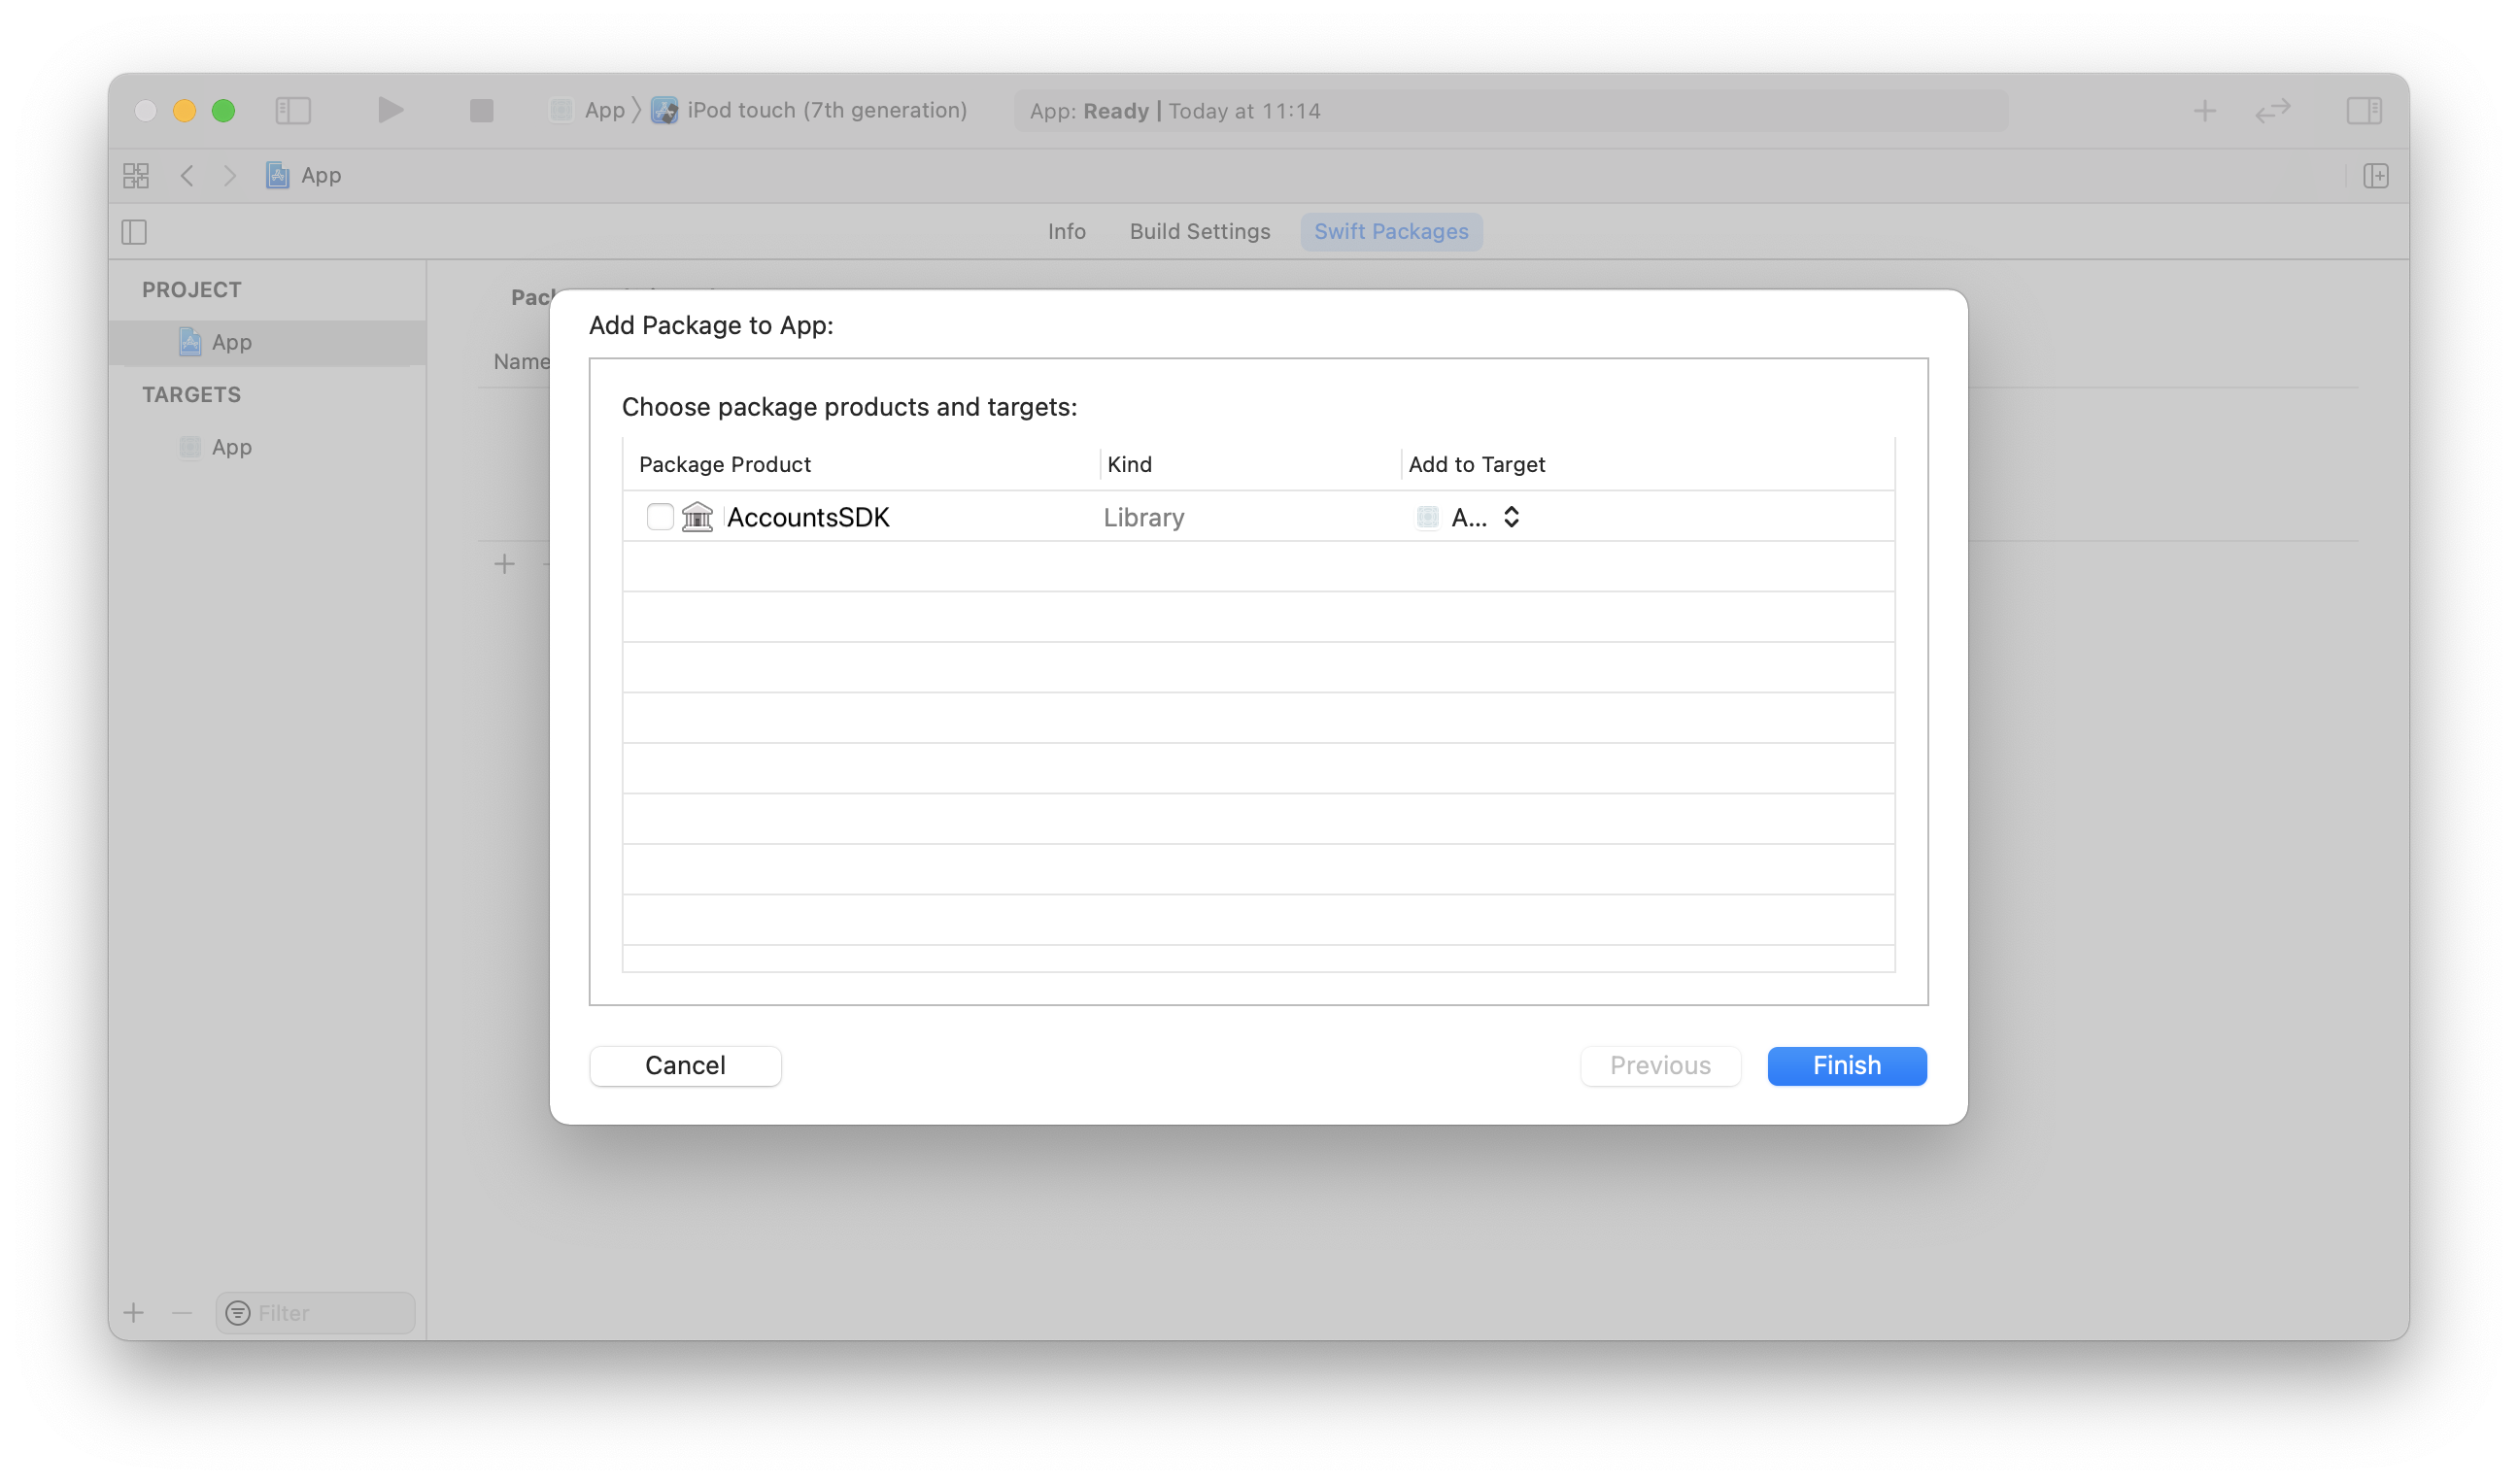
4. Select the AccountsSDK package and click Finish.
5. Repeat the same process for AlCore SDK (https://github.com/Alviere/alviere-core-ios). The current version is compatible with AlCore SDK version 0.9.0 and up.
CocoaPods
1. Get the latest version of CocoaPods, if you haven’t already.
2. Create the Podfile by running the following command, if you don’t have one already.
pod init
3. Add this line to your Podfile.
pod 'AccountsSDK'
4. Run the following command to install the library. Also, run this to update to newer releases in the future.
pod install
Carthage
1. Get the latest version of Carthage, if you haven’t already.
2. Add the following entries in your Cartfile:
binary https://raw.githubusercontent.com/Alviere/alviere-core-ios/master/AlCore.json
binary https://raw.githubusercontent.com/Alviere/alviere-camera-ios/master/AlCamera.json
binary https://raw.githubusercontent.com/Alviere/alviere-accounts-ios/master/AccountsSDK.json
3. Run the following command to download the latest version of the SDK.
carthage update --use-xcframeworks
4. Follow the Manual instructions below to embed the SDK into your project.
Manual
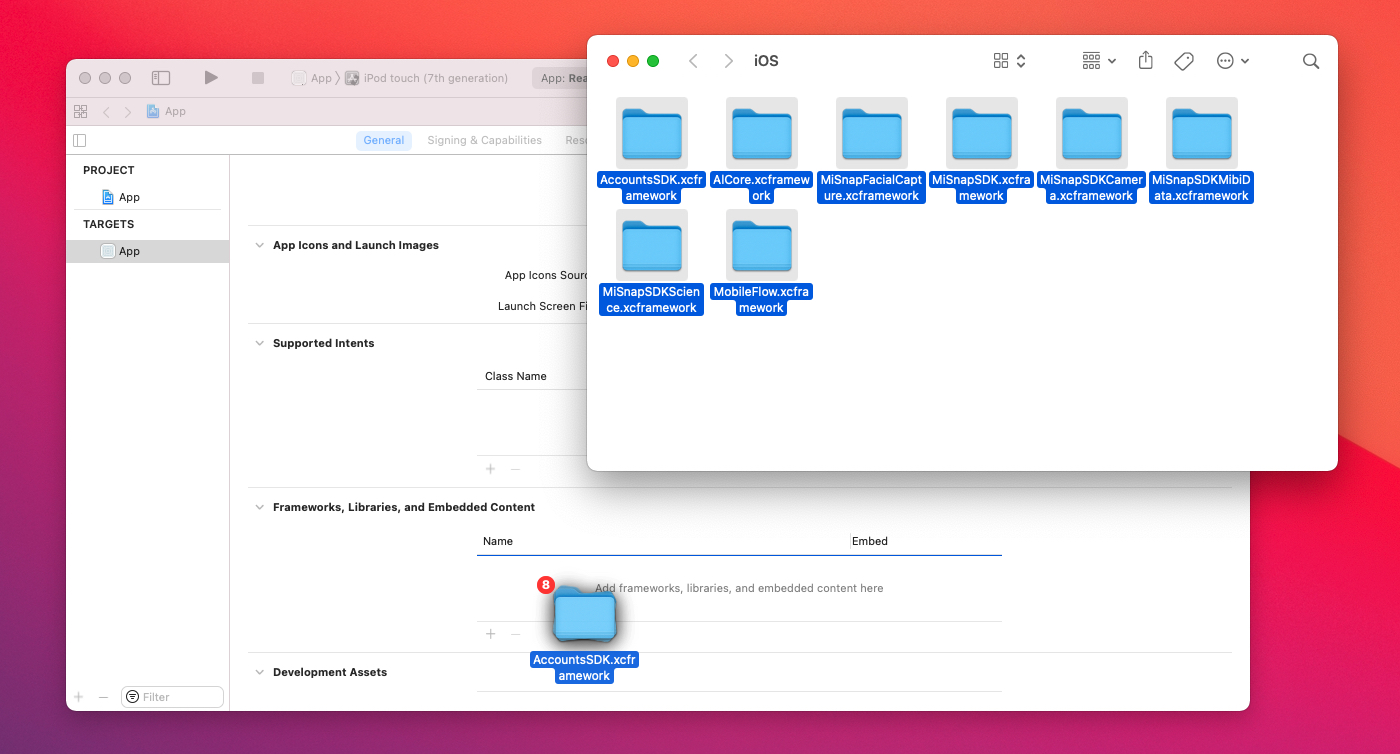
1. Get the latest versions of AccountsSDK.xcframework, its dependencies, and AlCore.xcframework and embed it into your application by dragging and dropping the files onto the Frameworks, Libraries and Embedded Content project section, as shown below.
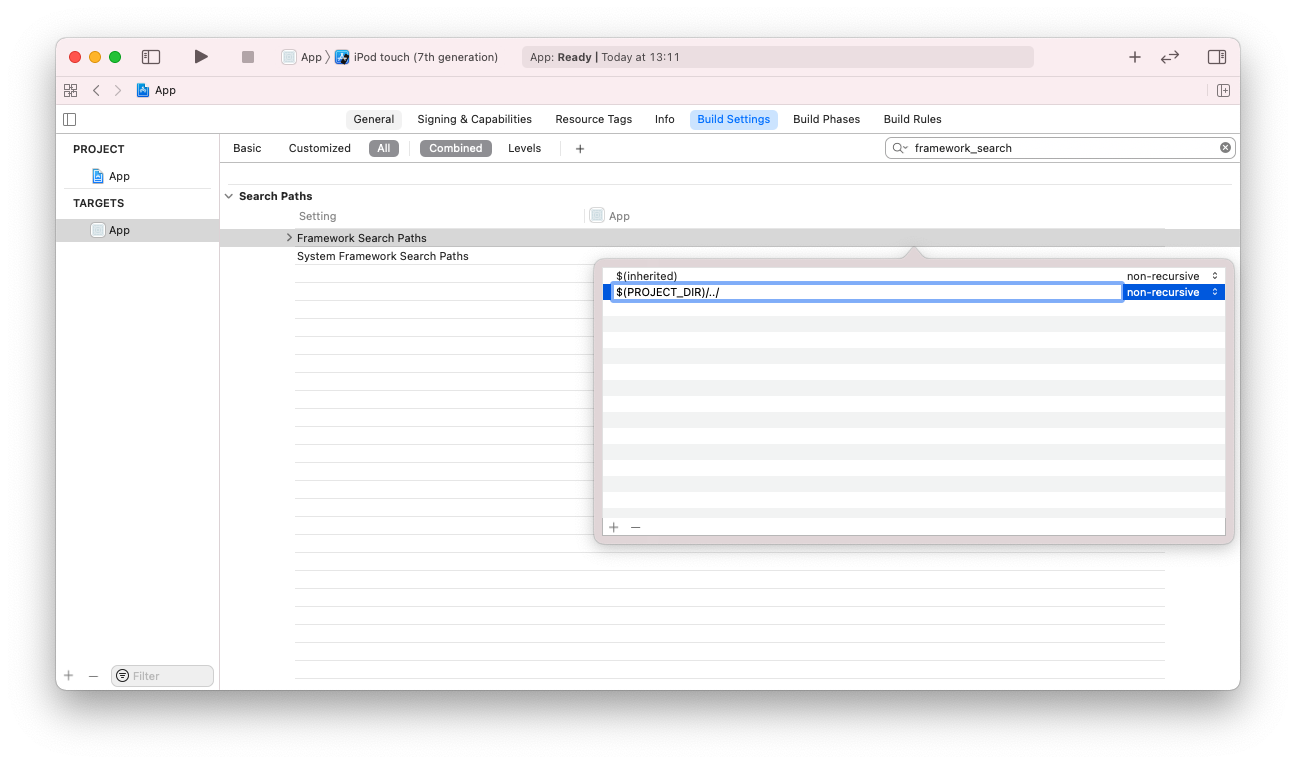
2. Depending on the location of the xcframeworks on the filesystem you may need to change the Framework Search Paths build setting to avoid the error: fatal error: ‘AccountsSDK/AccountsSDK.h’ file not found. For example, the Xcode project below have it set to FRAMEWORK_SEARCH_PATHS = $(PROJECT_DIR)/../ since the xcframeworks files are shared between them and are kept in the directory that also contains the project directories.
Usage
To initialize the Accounts SDK for iOS, you need to set the Environment at the entry point of your application. For example, you can do this on your AppDelegate file on the application(_:,didFinishLaunchingWithOptions:) method, as shown below.
import AlCore

...

func application(_ application: UIApplication, didFinishLaunchingWithOptions launchOptions: [UIApplication.LaunchOptionsKey: Any]?) -> Bool {
    // Setup Alviere SDK.
    if !AlCoreSDK.shared.setEnvironment(.sandbox) {
        print("Error initializing SDK.")
    }
    return true
}
After this setup, you just need to import the Accounts SDK for iOS on the files where you want to use the features.
import AccountsSDK
Optionally, if you will use the Add/Update/Replace Dossier features you have to adjust your app’s permissions for camera usage. You just need to add the NSCameraUsageDescription in your Info.plist file. Right-click somewhere outside the table and select Add Row. Now add the entries like below.

Or if you prefer to do this step with code, right-click on Info.plist and select Open As > Source Code. Add the lines below somewhere inside the <dict> </dict>.
<!-- Permission to be include in Info.plist -->
<key>NSCameraUsageDescription</key>
<string>This will let you easily take pictures of your Documents so we can verify your identity.</string>
When writing the permission request message always follow the iOS Human Design Guidelines as a guideline.
Account Management
List Accounts
To list accounts, use listAccounts where you will need to pass the auth_token.
let response = try await AlAccounts.shared
    .listAccounts(
        token: authToken,
        query: query
    )
This action will return a Account list or throw an EventError.
The keys for the EventError metadata field are defined on the Metadata enum.
Get Account
To get an account, use getAccount where you will need to pass the auth_token and pass the accountUuid.
let response = try await AlAccounts.shared
    .getAccount(
        token: authToken,
        accountUuid: accountUuid
    )
This action will return a Account or throw an EventError.
The keys for the EventError metadata field are defined on the Metadata enum.
Update Account
To update an account, use updateAccout where you will need to pass the auth_token, pass the accountUuid and the AccountUpdateRequest model with the data.
let request = AccountUpdateRequest( ... )

let response = try await AlAccounts.shared
    .updateAccout(
        token: authToken,
        accountUuid: accountUuid,
        data: request
    )
This action will return a Account or throw an EventError.
The keys for the EventError metadata field are defined on the Metadata enum.
Account Addresses Management
Create Account Address
To create an address, use createAddress where you will need to pass the auth_token, pass the accountUuid and the AccountAddressRequest model with the data.
let request = AccountAddressRequest( ... )

let response = try await AlAccounts.shared
    .createAddress(
        token: authToken,
        accountUuid: accountUuid,
        data: request
    )
This action will return a AccountAddress or throw an EventError.
The keys for the EventError metadata field are defined on the Metadata enum.
List Account Addresses
To list addresses, use listAddresses where you will need to pass the auth_token and pass the accountUuid.
let response = try await AlAccounts.shared
    .listAddresses(
        token: authToken,
        accountUuid: accountUuid
    )
This action will return a AccountAddress list or throw an EventError.
The keys for the EventError metadata field are defined on the Metadata enum.
Update Account Address
To update an address, use updateAddress where you will need to pass the auth_token, pass the accountUuid, pass the addressUuid and the AccountAddressRequest model with the data.
let request = AccountAddressRequest( ... )

let response = try await AlAccounts.shared
    .updateAddress(
        token: authToken,
        accountUuid: accountUuid,
        addressUuid: addressUuid,
        data: request
    )
This action will return a AccountAddress or throw an EventError.
The keys for the EventError metadata field are defined on the Metadata enum.
Delete Account address
To delete an address, use deleteAddress where you will need to pass the auth_token, pass the accountUuid and pass the addressUuid.
try await AlAccounts.shared
    .deleteAddress(
        token: authToken,
        accountUuid: accountUuid,
        addressUuid: addressUuid
    )
This action will not return a response but can throw an EventError.
The keys for the EventError metadata field are defined on the Metadata enum.
Account Dossier Management
Create Account Dossier
To create a dossier, use createDossier where you will need to pass the auth_token, pass the accountUuid and the AccountDossierRequest model with the data.
let request = AccountDossierRequest( ... )

let response = try await AlAccounts.shared
    .createDossier(
        token: authToken,
        accountUuid: accountUuid,
        data: request
    )
This action will return a AccountDossier or throw an EventError.
The keys for the EventError metadata field are defined on the Metadata enum.
List Account Dossiers
To list dossiers, use listDossiers where you will need to pass the auth_token and pass the accountUuid.
let response = try await AlAccounts.shared
    .listDossiers(
        token: authToken,
        accountUuid: accountUuid
    )
This action will return a AccountDossier list or throw an EventError.
The keys for the EventError metadata field are defined on the Metadata enum.
Get Account Dossier
To get a dossier, use getDossier where you will need to pass the auth_token, pass the accountUuid and pass the dossierUuid.
let response = try await AlAccounts.shared
    .getDossier(
        token: authToken,
        accountUuid: accountUuid,
        dossierUuid: dossieruuid
    )
This action will return a AccountDossier or throw an EventError.
The keys for the EventError metadata field are defined on the Metadata enum.
Update Account Dossier
To update a dossier, use updateDossier where you will need to pass the auth_token, pass the accountUuid, pass the dossierUuid and the AccountDossierUpdateRequest model with the data.
let request = AccountDossierUpdateRequest( ... )

let response = try await AlAccounts.shared
    .updateDossier(
        token: authToken,
        accountUuid: accountUuid,
        dossierUuid: dossierUuid,
        data: request
    )
This action will return a AccountDossier or throw an EventError.
The keys for the EventError metadata field are defined on the Metadata enum.
Replace Account Dossier
To replace a dossier, use replaceDossier where you will need to pass the auth_token, pass the accountUuid, pass the dossierUuid and the AccountDossierUpdateRequest model with the data.
let request = AccountDossierUpdateRequest( ... )

let response = try await AlAccounts.shared
    .replaceDossier(
        token: authToken,
        accountUuid: accountUuid,
        dossierUuid: dossierUuid,
        data: request
    )
This action will return a AccountDossier or throw an EventError.
The keys for the EventError metadata field are defined on the Metadata enum.
Delete Account Dossier
To delete a dossier, use deleteDossier where you will need to pass the auth_token, pass the accountUuid and pass the dossierUuid.
try await AlAccounts.shared
    .deleteDossier(
        token: authToken,
        accountUuid: accountUuid,
        dossierUuid: dossierUuid
    )
This action will not return a response but can throw an EventError.
The keys for the EventError metadata field are defined on the Metadata enum.
Upload Account Dossier
Upload Account Dossier UI Presentation
Be aware that you should request camera permission before presenting the upload dossier UI or it will be requested when presented.
To deposit a check, use createDossierUploadView where you will need to pass the auth_token, pass the cameraToken, pass the documentTypes, pass the AccountDossierUploadRequest model with the data and pass the onCompletion handler.
let cameraToken = try await AlCore.shared.getCameraToken(
    token: token,
    accountUUID: accountUUID
)
let request = AccountDossierUploadRequest( ... )

struct MyView: View {
    var body: some View {
        AlAccounts.userInterface.createDossierUploadView(
            token: authToken,
            cameraToken: cameraToken,
            documentTypes: [.driverLicenseFront, driverLicenseBack, .selfie],
            data: request,
            overlay: nil, // Optional custom overlay.
            loading: nil, // Optional custom loading.
            failure: nil // Optional custom error.
        ) {
            switch $0 {
            case let .success(dossier):
                // Handle success.
            case let .failure(error):
                // Handle error
            }
        }
    }
}
Capture Document UI Presentation
Be aware that you should request camera permission before presenting the capture document UI or it will be requested when presented.
To capture a check, use createCaptureDocumentView where you will need to pass the cameraToken, pass the cameraConfig and pass the onCompletion handler.
let cameraToken = try await AlCore.shared.getCameraToken(accountUUID: accountUUID)

struct MyView: View {
    var body: some View {
        AlAccounts.userInterface.createCaptureDocumentView(
            cameraToken: cameraToken,
            cameraConfig: cameraConfig,
            overlay: nil // Optional custom overlay.
        ) {
            switch $0 {
            case let .success(capture):
                // Handle success.
            case let .failure(error):
                // Handle error
            }
        }
    }
}
Overlay Customization
To customize the Overlay you can provide a ALCameraOverlayStyle implementation.
class MyOverlayStyle: ALCameraOverlayStyle {
    func makeTitle(content: Content) -> some View {
        // Customize content.
    }

    func makeDescription(content: Content) -> some View {
        // Customize content.
    }

    func makeStep(content: Content) -> some View {
        // Customize content.
    }

    func makeHint(content: Content) -> some View {
        // Customize content.
    }

    func makeSuccess(content: Content) -> some View {
        // Customize content.
    }

    func makeAcceptButton(content: Content) -> some View {
        // Customize content.
    }

    func makeRetakeButton(content: Content) -> some View {
        // Customize content.
    }

    func makeShutterButton(content: Content) -> some View {
        // Customize content.
    }

    func makeFlashButton(content: Content) -> some View {
       // Customize content.
    }

    func makeCloseButton(content: Content) -> some View {
        // Customize content.
    }
}

ALCameraOverlayView()
    .alCameraOverlayStyle(MyOverlayStyle())
You can also implement your own overlay. An ALCameraContext environment object with all the data and bindings required to create the overlay will be provided.
struct MyOverlayView: View {
    @EnvironmentObject
    var context: ALCameraContext

    var body: some View {
        // Implement overlay here.
    }
}
To provide a custom overlay configuration you can create a ALCameraConfiguration with your overlay configuration. An ALCameraContext environment object with all the data and bindings required to create the overlay will be provided.
struct MyFrameView: View {
    @EnvironmentObject
    var context: ALCameraContext

    var body: some View {
        // Implement frame here.
    }
}

var cameraConfig = ALCameraConfiguration.checkFront
cameraConfig.overlay.title = "my_title_string_key"
cameraConfig.overlay.description = "my_description_string_key"
cameraConfig.overlay.frame = MyFrameView()

AlAccounts.userInterface.createCaptureDocumentView(
    cameraToken: cameraToken,
    cameraConfig: cameraConfig
) { ... }
Loading Customization
To customize the Loading you can provide a custom view.
struct MyLoadingView: View {
    var body: some View {
        // Implement loading here.
    }
}
Failure Customization
To customize the Failure you can provide a ALFailureStyle implementation.
class MyFailureStyle: ALFailureStyle {
    func makeMessage(content: Content) -> some View {
        // Customize content.
    }

    func makeRetryButton(content: Content) -> some View {
        // Customize content.
    }

    func makeCancelButton(content: Content) -> some View {
        // Customize content.
    }
}

ALFailureView()
    .alFailureStyle(MyFailureStyle())
You can also implement your own failure. An ALFailureContext environment object with all the data and bindings required to create the failure will be provided.
struct MyFailureView: View {
    @EnvironmentObject
    var context: ALFailureContext

    var body: some View {
        // Implement failure here.
    }
}
UI Localization
To localize the UI you will need to create a ALCameraConfiguration with your bundle and string table.
The keys you need to provide are listed in Text and Localization.
var cameraConfig = ALCameraConfiguration.checkFront
cameraConfig.bundle.bundle = myBundle
cameraConfig.bundle.table = "myStringsCatalog"

AlAccounts.userInterface.createCaptureDocumentView(
    cameraToken: cameraToken,
    cameraConfig: cameraConfig
) { ... }
Fraud Prevention Service
The Accounts SDK has a built-in fraud prevention service. This service is automatically activated when you Update an User Account. If you already have an account created and want to activate the service on the next app run you just need to set the accountUuid on the service as the user id. For example, you can do this on your AppDelegate file on the application(_:,didFinishLaunchingWithOptions:) method, as shown below.
import AlCore

...

func application(_ application: UIApplication, didFinishLaunchingWithOptions launchOptions: [UIApplication.LaunchOptionsKey: Any]?) -> Bool {
    // Setup Alviere SDK.
    if !AlCoreSDK.shared.setEnvironment(.sandbox) {
        print("Error initializing SDK.")
    }

    // Start fraud prevention service.
    AlCoreSDK.shared.startFraudPrevention()
    AlCoreSDK.shared.setUserId(accountUuid)
    return true
}
To fully enable the service you need to do a small setup by adding the add the LSApplicationQueriesSchemes array in your Info.plist file. Right-click somewhere outside the table and select Add Row. Now add the entries like below.

Or if you prefer to do this step with code, right-click on Info.plist and select Open As > Source Code. Add the lines below somewhere inside the <dict> </dict>.
<!-- Fraud prevention setup to be included in Info.plist -->
<key>LSApplicationQueriesSchemes</key>
<array>
  <string>cydia</string>
</array>
Text and Localization
The Accounts SDK for iOS allows you to customize the UI text. To do so, you will need to redefine the localization key that you want to change on your Localizable.strings file. The next section details a list of the current localization keys. Currently, the SDK only provides english localization.
Localization Keys
| Key | English Value |
|---|---|
| alviere_sdk_camera_driver_license_back | Driver’s License Back |
| alviere_sdk_camera_driver_license_back_description | Place ID on a flat surface. Please no fingers, hands or reflections. |
| alviere_sdk_camera_driver_license_front | Driver’s License Front |
| alviere_sdk_camera_driver_license_front_description | Place ID on a flat surface. Please no fingers, hands or reflections. |
| alviere_sdk_camera_failure_view_cancel | Cancel |
| alviere_sdk_camera_failure_view_message | An error occurred |
| alviere_sdk_camera_failure_view_retry | Try again |
| alviere_sdk_camera_hint_angle_too_large | Angle too large |
| alviere_sdk_camera_hint_busy_background | Busy background |
| alviere_sdk_camera_hint_data_obstructed | Data obstructed |
| alviere_sdk_camera_hint_face_center | Center face in the oval |
| alviere_sdk_camera_hint_face_get_closer | Get closer |
| alviere_sdk_camera_hint_face_get_farther | Get farther |
| alviere_sdk_camera_hint_face_hold_device_upright | Hold device upright |
| alviere_sdk_camera_hint_face_hold_still | Hold still |
| alviere_sdk_camera_hint_face_low_lighting | Increase light on face |
| alviere_sdk_camera_hint_face_no_face | No face detected |
| alviere_sdk_camera_hint_face_smile | Smile! |
| alviere_sdk_camera_hint_face_stop_smiling | Stop smiling |
| alviere_sdk_camera_hint_glare | Reduce glare |
| alviere_sdk_camera_hint_hold_steady | Hold still |
| alviere_sdk_camera_hint_low_contrast | Low contrast |
| alviere_sdk_camera_hint_not_identity_back | Not document back |
| alviere_sdk_camera_hint_not_identity_front | Not document front |
| alviere_sdk_camera_hint_not_passport | Not passport |
| alviere_sdk_camera_hint_not_sharp | Not sharp |
| alviere_sdk_camera_hint_nothing | Nothing detected |
| alviere_sdk_camera_hint_rotation | Reduce rotation |
| alviere_sdk_camera_hint_too_bright | Too bright |
| alviere_sdk_camera_hint_too_close | Too close |
| alviere_sdk_camera_hint_too_dim | Too dim |
| alviere_sdk_camera_hint_too_far | Too far |
| alviere_sdk_camera_id_document_back | ID Document Back |
| alviere_sdk_camera_id_document_back_description | Place ID on a flat surface. Please no fingers, hands or reflections. |
| alviere_sdk_camera_id_document_front | ID Document Front |
| alviere_sdk_camera_id_document_front_description | Place ID on a flat surface. Please no fingers, hands or reflections. |
| alviere_sdk_camera_ine_document_back | INE Back |
| alviere_sdk_camera_ine_document_back_description | Place ID on a flat surface. Please no fingers, hands or reflections. |
| alviere_sdk_camera_ine_document_front | INE Front |
| alviere_sdk_camera_ine_document_front_description | Place ID on a flat surface. Please no fingers, hands or reflections. |
| alviere_sdk_camera_mc_document_back | Matrícula Consular Back |
| alviere_sdk_camera_mc_document_back_description | Place ID on a flat surface. Please no fingers, hands or reflections. |
| alviere_sdk_camera_mc_document_front | Matrícula Consular Front |
| alviere_sdk_camera_mc_document_front_description | Place ID on a flat surface. Please no fingers, hands or reflections. |
| alviere_sdk_camera_passport | Passport |
| alviere_sdk_camera_passport_description | Place ID on a flat surface. Please no fingers, hands or reflections. |
| alviere_sdk_camera_preview_accept | Accept photo |
| alviere_sdk_camera_preview_retake | Retake |
| alviere_sdk_camera_preview_success | Success |
| alviere_sdk_camera_preview_title | Photo preview |
| alviere_sdk_camera_proof_of_address | Proof of Address |
| alviere_sdk_camera_proof_of_address_description | Place ID on a flat surface. Please no fingers, hands or reflections. |
| alviere_sdk_camera_proof_of_funds | Proof of Funds |
| alviere_sdk_camera_proof_of_funds_description | Place ID on a flat surface. Please no fingers, hands or reflections. |
| alviere_sdk_camera_selfie | Face |
| alviere_sdk_camera_selfie_description | Smile to automatically grab your picture. |
| alviere_sdk_camera_articles_of_incorporation | Articles of Incorporation |
| alviere_sdk_camera_articles_of_incorporation_description | Place document on a flat surface. Please no fingers, hands or reflections. |
| alviere_sdk_camera_certificate_of_good_standing | Certificate of Good Standing |
| alviere_sdk_camera_certificate_of_good_standing_description | Place document on a flat surface. Please no fingers, hands or reflections. |
| alviere_sdk_camera_org_chart | Organization Chart |
| alviere_sdk_camera_org_chart_description | Place document on a flat surface. Please no fingers, hands or reflections. |
| alviere_sdk_camera_ubo_form | UBO Form |
| alviere_sdk_camera_ubo_form_description | Place document on a flat surface. Please no fingers, hands or reflections. |
| alviere_sdk_camera_step %lld %lld | Step %1$lld of %2$lld |